Showing posts with label Heart2Heart Challenges. Show all posts

Monday, July 4, 2016

Heart2Heart Challenges - Magical!

This week at Heart2Heart we are getting Magical and celebrating CTMH's Magical paper collection!  I wanted to show you something today that you might not be aware of - that you can use our sticker Compliments twice!
I had already used the black "Big Smiles" sticker from our Compliments collection on another project but I wanted to make a fun birthday card using the same sentiment.  Our stickease always have a margin on the outer edge of the sticker that ensures your sticker is lined up nicely when they cut them but it also gives you the opportunity to use the negative cut on additional projects!

 I cut the empty sticker outline from the sheet of stickease and then bubble cut around it.  After carefully laying it down with all the inside pieces like the black holes in the letter e and g, I added some sparkle with my Wink of Stella pen.
I used several of the chipboard compliments and a variety of papers to make a high impact fun card.

I hope you'll add a dash of Magical fun to your day by joining us at Heart2Heart Challenges this week!  Just create a project using this paper pack, the colors or the name as an inspiration and then share your project with the Linky provided on the Heart2Heart Challenges site!

If you need to pick up some crafty Magical supplies then visit my shopping site at:


Thanks for stopping by today!  Stay crafty my friends!

Paige

Monday, February 29, 2016

Heart2Heart Challenges - Three Challenge

Heart2Heart Challenges is hosting a "Three" challenge this week in honor of the third month of the year.  When we had a "Two" challenge I used the actual number in my project so this month I wanted to shake things up and represent the number instead.

My project uses three panels and the same balloon stamped three times giving it movement across the card. The paper, balloon and confetti images are from our adorable Kaleidoscope Cardmaking Workshop.
I swiped my balloon across my Pomegranate ink pad and then lightly rolled the edges and stamped off on scrap for a second generation impression.  I knew I wanted to add tone on tone confetti and I like the way it makes the balloon seem almost transparent in the sunlight.
I sponged a bit of Crystal Blue ink around the balloon panels for a hint of sky and used a scattering of silver and gold sequins finishes off this simple card. The sentiment is from our awesome February SOTM Balloon Animals which I masked off to make it read across the card.

Thanks for stopping by today!  I hope you enjoyed my project and if you'd like to purchase any of the items used you can click on the links below!  Don't forget you have a whole month to play along at Heart2Heart Challenges so get crafty and link your projects!

Stamps:  Kaleidoscope Cardmaking Workshop. Balloon Animals (Feb SOTM)

Monday, February 15, 2016

Heart2Heart Challenges - Shades of Red

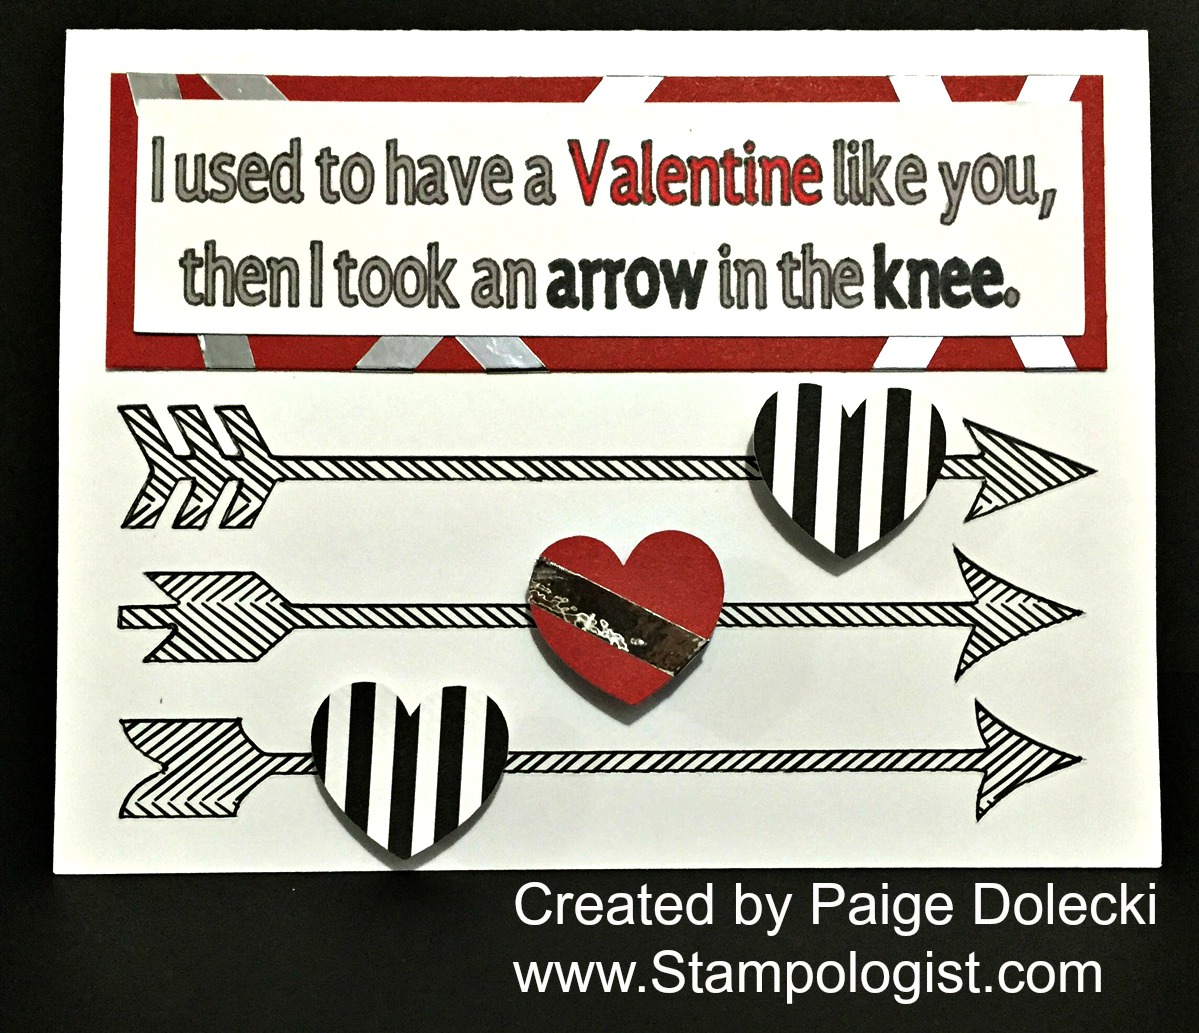
This is my Design Team project for Heart2Heart Challenge's "Shades of Red, Black and White" challenge this week.  I had one last Valentine to make today - one for my 14 year old son.  His primary interest is video games so I altered a meme from the Skyrim franchise.  I thought I'd explain it because if you don't have a gamer in the house the sentiment on this card probably seems really, really weird!
I used our La Vie En Rose paper pack for all the lovely black and white papers on this card and mixed it with Ruby cardstock.  The arrow card base is from our Artfully Sent cartridge and I had my Explore write the font from the Artiste cartridge so I could fill in with Shinhan Touch Twin markers and empahsize certain words. I outlined the arrows with our Journaling Pen and added some fun Silver Foil Tape to pop things up a bit.
The inside of the card has a fun heart border from Artistry layered with black underneath the stripes to give it a fun 3-D effect.
Hopefully my kiddo will like this one (I know he'll like the chocolate I bought him)! Thanks for stopping by today and I hope you'll hop on over to the Heart2Heart Challenges blog and join the fun in our "Shades of Red, Black and White" challenge!

Stay crafty my friends!

Paige


Monday, November 2, 2015

Heart2Heart Challenges - Through a Window

Today our challenge at Heart2Heart is "through the window" so I grabbed my CTMH Artfully Sent cartridge and our Sangria paper pack and made this fun word bubble window card.  It's bright, wacky, borderline tacky but kind of fun!
I applied a second card front with temporary adhesive to the front of the card so I could sponge through the cuts and get this look on the white liner. Confession - I had a second card front because my Cricut chewed the first paper I put through because my mat wasn't sticky enough and the paper shifted and rolled.  My quick fix was grabbing some Washi tape to hold down the corners of the next sheet of paper until I get a chance to wash my mats.
I hadn't used this set Mini Messages Hostess Rewards set yet so I had fun stamping all the cute little sayings inside the windows!

Thanks for stopping by today and I hope you'll take the challege at Heart2Heart and create a "through the window" project to share!

Paige

Monday, August 24, 2015

Artistry Octopus Card - Getting Ready for Senior Year with Heart2Heart Challenges!

This week I'm the Hostess with the Most-est over at Heart2Heart Challenges for the "Working 9-5" challenge!  It's always a blast getting a sneak preview of what the Design Team has created for the week's challenge!

I'm sharing a fun octopus card I made for my son who is starting his senior year or high school in less that two weeks!  He is looking at studying Marine Biology when he goes to college so I immediately thought of the ADORABLE octopus on our new CTMH Artistry cartridge!


Once I got him on the paper I just had to give him some school appropriate things to hold - can you believe how tiny I was able to get the letter on the notebook? The tiny smart phone totally cracks me up too!  All his little accessories with the exception of the notebook (Artbooking I think) come from our new Artistry cartridge.  If you don't have this one yet you NEED to get it - it is just too cool!  I can't wait to give this to him right before school starts!

Stay crafty my friends and make something beautiful today!

Paige

Monday, July 27, 2015

Life is GOOD - Heart 2 Heart Challenges

Heart2Heart Challenges has a Life is Good theme challenge going on this week that I hope you'll join in!  Anyone can enter by adding their picture as a thumbnail to the challenge blog - the only requirement is to have some CTMH product in your project!  

Today I wanted to showcase the retiring colors from our Enchanted color palette in using our theme.  I pulled up Design Space and found an everday life PML card in our Artfully Sent cartridge.  I deleted the word everyday and added text in our Art Philosophy font.  I think the happy couple is from our Artbooking cartridge and the Smokey Plum circle may be from Artiste. This may be a record for the most number of cartridges used on a single card for me! 


The retiring colors used on this card are Indian Corn Blue, Outdoor Denim, Olive, Barn Red and Smokey Plum.  The darker green is New England Ivy which IS staying (I meant to pull a sheet of Ponderosa Pine which is on the retiring list!).
.
Check your CTMH paper pack stash and be sure to stock up on retiring cardstock that you need to finish layouts or re-inkers to keep your ink pads juicy for years to come!  Those sell out very quickly and almost always before the retirement date (August 31).  

Shop at:

Enchantment Palette Changes:

Retiring - Smokey Plum, Outdoor Denim, Indian Corn Blue, Ponderosa Pine, Olive, Autumn Terracotta, Barn Red

Staying - New England Ivy, Goldrush, Ruby


Thanks for stopping by today!  I hope you'll join us at Heart2Heart Challenges this week!

Paige

Monday, July 13, 2015

Life is a Beach - Heart 2 Heart Challenges

Today is my first post for my new role in the Slate Design Team at Heart 2 Heart Challenges!  Our theme of the week is Life is a Beach so get out the sunscreen and join me by surfing through all our beachy themed projects today at the Heart 2 Heart Challenges Blog!  I hope you'll join the fun by posting your beach themed project (must contain some CTMH product) on our linky at the H2H Challenges Blog!

I made this card for my beach loving 17 year old's birthday. One of his gifts will be a day trip to the ocean when I get back from Convention. There is nothing he likes better than spending the day checking out the critters in tide pools and the sand!


This card uses lots of bits from different paper packs - so fun pulling colors to make my scene come alive!

Sand - Champagne CS
Sun and Paradise sign - Honey CS
Surf Boards - Scaredy Cat and Wanderful

If you'd like to purchase any of these materials you can visit my shopping site at:

If you have an Explore and the Artbooking Cartridge and would like to duplicate this card, here is the Design Space file for you to use:

This is posting while I'm away to CTMH Convention in Disneyland.  I'll be home soon and I'm sure just bursting with excitement over what is coming this year from CTMH! I already know there is a new Cricut cartridge on the way and you KNOW how much I love those!  Thanks for stopping by today and come back soon!

Stay crafty my friends,

Paige

Monday, December 16, 2013

3-D Ornament Christmas Card for Heart2Heart Sparkle and Shine Challenge

Hello my crafty friends!

Today I'm sharing my last post for the Heart2Heart Challenges Design Team this season.  We were challenged to make a project using the colors from our Sparkle and Shine paper pack - Ruby, Juniper, Slate  and White Daisy - such fun Christmas colors I knew I'd have to finish up my term by filling up my Christmas card stash!

This fun 3-D card was created by cutting out 4 of the ornament image, folding down the middle and gluing them back to back.  It will fold down for mailing and pop back up when its pulled from the envelope.  What a fun surprise for the person who gets this for Christmas!


Top view to show the dimension on this one.

This card is also a "Sneak Peek" at an upcoming special workshop kit in January - the kit will be called Cloud 9 and comes with washi tape, glitter tape, some fun embellishments, a super trendy stamp set and 5 awesome card patterns.  I took the card patterns and put them all into CCR and cut the workshop featuring different papers and accessories.  I just LOVE how beautiful and classy our patterns are - if you change up the papers and embellishments you get a whole new feel!  

I'll be sharing the rest of the cards over the next week or so and then show you a picture of the Cloud 9 kit - you're going to LOVE it!  It will be available for $15 with a $35 purchase as of January 1 - so worth it as you get a full D size stamp and THREE full accessory packs!

*If you order the kit through me, I'll send you the CCR file so you can cut the entire Cloud 9 kit without having to hassle with a paper trimmer!  My exclusive file uses our Artiste cartridge and I have a bonus layer for the 5 Christmas cards I'll be sharing over the next week as well.  If you love using CCR, consider joining my Hostess Club as I add new files to my exclusive Hostess Club CCR file drive every month! 

So are you ready to get your Sparkle and Shine on and join us in this color challenge?  Simply make a project using the color combination of Ruby, Juniper, Slate and White Daisy and link it to Heart2Heart Challenges and you'll sparkle and shine right up through the New Year!

Holiday hugs,

Paige

Monday, November 18, 2013

Game On Challenge for Heart2Heart Challenges

This week's challenge at Heart2Heart Challenges theme is "Game On".  I'm pretty sure most of you can figure out that I went with a Scrabble theme for my card!  Do the dashes and dots on the card edge remind you of morse code too?


I put a bit of Liquid Glass on the Santa tiles to pop them up and give them a bit more emphasis - its a clue to which word to read first.


I cut the tiles from an retired paper pack called Cruisin'.  I've been using our Metallic Markers a whole lot lately for Christmas projects and I LOVE them!  They give a nice thick shiny layer and don't smell bad like Sharpies do.  They come ins a silver/gold set perfect for adding a dash of shine to your holiday projects.

I hope you'll stop by Heart2Heart Challenges this week and joing the fun with our Game ON challenge!

Stay crafty my friends!

Paige

C1567 Santa Claus
Chocolate Ink
Metallic Markers
Red Glitz Glitter Gel

Monday, October 21, 2013

Lovely Lace in Pinks and Browns

This week's challenge at Heart2Heart is to create something with a "lace" theme.  You can use actual lace, stamped lace, lace something up, etc.  The only rule is to use some CTMH product on your finished item!

I've had the Workshop on the Go stamp from Buzz and Bumble for a while now and only just ink it up.  I try really hard to use all my stamps as they come in - partially so I feel like I'm getting my money's worth out of my supplies (that's the frugalista in me) but also because sometimes your stamps surprise you (that's the artist in me).  The bottom lace panel on this card is a stamp that comes with the Artbooking cartridge but when I inked up in brown and repeated on the small piece, it took on a whole new look to me!
I used a combination of watercolor pencils, reinker and alcohol markers to color the flowers for this one.  

I hope you'll join us at Heart2Heart Challenges this week and create something "lacey" to share!  If you need to pick up a few CTMH supplies for your project, visit my online shopping site!


Stay crafty my friends!

Paige


Monday, October 14, 2013

Oh Snap! Belated Birthday Camera Card - October's FREE CCR file!

One of the many icons on our new Artbooking Cricut Cartridge is a fun camera shape used in one of the mini books.  When I saw that this week's challenge for Heart2Heart Challenges was to create a card with a shaped base, I knew this was the shape I wanted to use to create a belated b'day card with the "Oh, Snap" title on it.  I'll admit up front that I am way better at making cards than getting them in the mail on time so some belated b'day for my stash was just the thing!
I created the shaped base in Cricut Craft Room by taking two images, flipping one and welding them together at the top. The card is standard sized - 5.5x4.25" to fit into a regular envelope.
Decorated inside:

This cutie will be the free file for the month of October to anyone who purchases through me!  Place an order of any size and I'll e-mail you a copy of the CCR file set up to make a pair of these cards - cause if you are going to make them you might as well make two at the same time! This will also go into the Hostess Club CCR file drive for those lucky ladies who participate in my club - want to find out more about my club and how you can get all my files?  Click HERE.

I hope you'll join us at Heart2Heart Challenges this week and create a fun shaped card to share!  Shaking things up with a shaped base is always fun and with our Cricut Cartridges doing the heavy work, its easy as can be too!

Thanks for stopping by today!  Stay crafty my friends!

Paige

Monday, September 30, 2013

Interactive Spinning YoYo Card with Video Tutorial and free CCR file

Hello my crafty friends!

I'm excited to share today's card that I created for Heart2Heart Challenge's "Au Naturale" challenge this week - specifically to create something either using neutrals (natural) or nature themed.  This one has a little bit of both to qualify but the fun interactive spinning YoYo element is what really made it a blast for me to create.  All my kids got a kick out of it so be sure to watch (and hopefully like and subscribe to!) my YouTube video to show you how to create this easy and fun element so you can surprise a loved one with a fun spinning YoYo card!


Here is the video tutorial - if you are receiving this via e-mail you'll need to click out to my blog by clicking the title of this post at the top to see the video!

And here are the free CCR files so you can make an exact copy of this card.  The files use Art Philosophy for the elements.  Click the file type below to download and import the file for use.

Shop my online site here:

If you'd like to purchase the materials to create this file, please click on the linked products below:

Thanks for stopping by today!  I hope you'll join us over at Heart2Heart Challenges this week and create something "Au Naturale" to share with all of us!

Stay crafty my friends,

Paige

Monday, September 2, 2013

Honeycomb card for Heart2Heart Color Challenge

This week Heart2Heart Challenges is hosting a color combination challenge of Cashmere, Sunset, Barn Red and Gypsy.  At first I wasn't sure how these colors would combine but once I played with them I fell in LOVE with the combination!  It had such a fun vintage vibe going on I thought it would be perfect for a card with a quilt feel to it - something warm and snuggly like a hug that I can send to a friend who had a rough week.

I have a confession to make.  When the Honeycomb stamp set came out last year I didn't get it even though I really liked it.  Why?  Because I didn't want to have to hand cut all those beautiful hexagons.  I know, I know, I'm totally spoiled by my Cricut now aren't I?  BUT when Artbooking was previewed for consultants, a friend shared with me that you can cut the honeycomb overlay at 11" and it will create spaces that perfectly fit this set.  Even better?  All the negatives that are left on the mat are sized to stamp on with the set and pop dot them up.  Can you say FABULOUS!  So, I had to order this set this month so I could play!


The heart and banner shape are from the new Laughing Lola Card Workshop kit.  I knew that set would become a favorite for me to make cards!


I hope you'll join us at Heart2Heart Challenges this week and combine Cashmere, Sunset, Barn Red and Gyspy into a project that speaks to you!

Click on the links below to shop for the products used to make this project:
Artbooking Cricut Cartridge (for honeycomb overlay used for spacing)
Artiste Cricut Cartridge (to cut the heart shape)
Honeycomb Stamp Set
Other:  Bee stamp is from a retired Petite Perks, Flower, leaves and Barn Red brad are retired items


Monday, August 5, 2013

Mixed Media Canvas for H2H Challenges Bon Voyage Challenge

Today I have the great honor of being the writer for the Bon Voyage challenge at Heart2Heart Challenges so I'll copy what I wrote on proverbial challenge wall!

I've always loved the phrase bon voyage or good journey because it's full of the promise of adventure, fresh starts and exploration. Today we are dedicating this challenge to our newest members of the Close to my Heart sisterhood, the new consultants in Australia and New Zealand. We wish you all buckets of creativity and a joyous start on your new adventure as Close to my Heart consultants and want to give you a warm welcome and invitation to participate in our challenges!

My personal project today is all about my own good journey - being wife to my hubby for the last 22 years.  We've definitely had our fair share of squalls hit us but as a couple we've always grown stronger and closer through the challenges.  I love this guy to pieces for his dedication to our family, keeping me laughing all these years and his support and unconditional love.  I've always said he was the North Star to my wayward journey and this little project captures what he means to me.

Our Tommy paper pack was perfect for this project!  I used the WOTG stamp set for the waves, ship and tag.  The sentiment on top of the Artiste rosette is from the Sail Away stamp set.

The background was colored with Gelatos.  On the water part, I stamped the waves with Outdoor Denim pigment ink and then embossed it with Clear Detail embossing powder.  The boat was embossed with White Daisy powder on the yellow Tommy paper and pieced with some of the blue paper.  I wrapped the frame with some Cranberry CS to give it a finished look.  This baby is going to be displayed downstairs for a while and will probably wind up decorating my craft room eventually.

I hope you'll join us at Heart2Heart Challenges this week with your own interpretation our Bon Voyage challenge!  Be sure to use some CTMH product so your linky stays live!

Click on the links below to shop for the products used:
Tommy Paper Pack
Tommy WOTG Stamp Set
Sail Away Stamp Set
Outdoor Denim Pigment Ink
White Daisy Embossing Powder
Clear Detail Embossing Powder
Artiste Cartridge (rosette)
Art Philosophy Cartridge (tag, banner pieces)
Outdoor Denim Chevron Ribbon
Neutral Baker's Twine Collection

Stay crafty my friends,

Paige

Monday, July 8, 2013

Rediscover Happy Quilted Card with Tutorial for Heart2Heart Challenges

I was so excited to be asked to stay on board the Design Team at Heart2Heart Challenges for another term!  I love our creative challenges and the fact that I can showcase Close to my Heart products each week not to mention the fact that I get to play with awesomely talented ladies who share my love of CTMH!

This week our challenge is a Mix and Match challenge - use either 3 different stamp sets OR 3 different paper packs.  I decided to use almost all the current paper packs (I accidentally forgot Surf's Up - eek!) and make a fun set of quilted cards to showcase the FREE Downloadable labels CTMH has given us as part of our new "Rediscover Happy" campaign!  I'll link up to that download at the end of this post so be sure to scroll all the way to the end!


I had so much fun with this technique I wound up making 11 cards!  

Here is a quick tutorial on how to make these cards:
Instructions:
1.  Cut 1" wide strips of your patterned paper scraps (mine are 1x3")
2.  Adhere strips side by side in a pleasing pattern on some lightweight copy paper.
3.  Cut 1" rows off the top of your strip so you have a series of 1" blocks.
4.  Adhere the blocks to a plain card base to the size you want (here I did 3 rows).
5.  Emboss the entire piece with an embossing folder of your choice.
6.  Add a "Rediscover Happy" sentiment tag (CLICK HERE for your FREE copy)

This technique is a fabulous way to use up scraps of papers and I love the crazy quilt look of the finished card.  Now grab your CTMH stamps and papers and have some fun with our Mix and Match Challenge! See you at Heart2Heart Challenges later this week!

\  
Stay crafty my friends,

Paige

Monday, June 17, 2013

Vintage Photo Frame with Quilled Roses Video Tutorial - Heart2Heart Challenges

We have an awesome vintage photo inspiration at Heart2Heart Challenges this week, roll on down to see the photo inspiration below!  I chose to use the colors and the 3-D nature of the inspiration piece for my Design Team project - an altered picture frame.  

I created a frame of Silver Glitter Tape on the front of the picture frame and then adhered my pieces on top of the Glitter tape.  I've found that sometimes when you adhere glue directly to plastic you can have your pieces come off when they dry - always a bummer after you've put time and effort into something.  I also used a sweet little altered clothes pin that I made a couple of years back and added a new sponged Artiste bird cut to the top of the clip.

Heart2Heart Challenge Photo Inspiration

Showing the 3-D roses (video below).
I created the frame for a picture of my Dad and me - right now I have a printer copy of the photo in it but the skin tones are a bit weird (hence me not posting it here).  I'll get a print done at Costco in the next week to replace it.  My Dad is in the hospital and I'm feeling blue that I'm so far away and  can't be there for him.  I'll probably be heading out for a visit within the next couple of weeks as its been way too long since I've gone home.  Sniff, sniff.


Still shot of the finished roses.

I hope you enjoyed my video!  I'm new at the video tutorial game so let me know what you think!

Now grab some CTMH supplies and create your own project for this week's Heart2Heart Challenge

Stay crafty my friends!

Paige


Thursday, May 23, 2013

Cutting your stamps apart feels so naughty - Bumble Bee card with CTMH Buzz and Bumble and Quick Cards Bumble Bee

Here is a sweet little bee card made with our Buzz and Bumble paper pack and our $6.95 A sized Quick Card Bumble Bee stamp set.  

If you look at the actual stamp image below you'll notice I didn't use the sentiment that is attached to the stamp.  Hold your breath and get ready for this - I sometimes CUT my stamps APART.  Eeek - I know.  It does feel somewhat "naughty" when I do it but I use a pair of our extra sharp microtip scissors and make sure its a stamp that can be cut easily with space between pieces.  Sometimes I just know I'll use a stamp more if its separated than if all the pieces are together.


I'm entering this in our Heart2Heart Creature Feature challenge this week as a bonus submission!  You have all month to submit for our challenges so make sure you get your critters out and get stamping!

Hugs,

Paige

Related Posts with Thumbnails

Blog Archive

Copywrite - or sharing the love!

Thank you for visiting me here on my blog today! I hope you have been inspired by my postings to create something lovely for yourself! It does take me a whole lot of time to create the artwork, tutorials and posts for this blog so if you would like to borrow my wording or artwork then I respectfully ask that you e-mail me for permission, credit me and/or link back to my blog. Thanks for your understanding and respect!

Paige