Showing posts with label Gift Item. Show all posts

Monday, January 19, 2015

Oversized Rose Valentine's Day Box - Project #8 January Card Buffet

This sweet box with its oversized rose is project #8 for our January Card Buffet.  Perfect to fill with a few sweets for your special sweetie, you can make this project and many more by signing up today!

RSVP your spot at the crafting table by sending me a message to Paige@Stampologist.com.  The Card Buffet is a $15 flat fee for 2 hours of unlimited pre-cut, prepped and ready to stamp and assemble projects.  

For full details see this post here:

Thanks for stopping by today!

Paige

Sunday, November 30, 2014

December Stamp of the Month Blog Hop

Welcome to our December Stamp of the Month Blog Hop!  This month a group of 60+ CTMH Consultants are featuring our adorable December Stamp of the month called Cutie Pie. If you are coming from Gina's Blog then you are on the right track! If you get lost along the way the complete listing of all the participating blogs is found by clicking HERE.

I have just 5 days left to get ready for the big Mt Si Holiday Bazaar on December 6th so I'm up to my elbows in projects for the show.  One of the items I'm making this year are Base and Bling Pendants with cute holders - perfect for holiday gift giving or as a present for yourself!  This month's SOTM Cutie Pie coordinated so perfectly with our sweet Petite Perks "With Toppings" stamp set that I just couldn't resist creating a special pendant with the mini cupcake!

I used Memento Ink to stamp on our Whimsy Paper Fundamentals (the Pixie Pink heart paper) and also on some Glacier cardstock.  I paper pieced both small and big cupcake and added some accents with our Shinhan Touch Twin markers. 
I punched a 1" circle of our black Glitter Paper for the pendant backer and followed up with a dash of Silver Shimmer trim to highlight the pendant.  I thought the sentiment from the SOTM went perfectly with this necklace as a gift item.  I'll have a complete listing of products used at the end of this post so you can copy this adorable set for a cupcake in your life!

To purchase the SOTM for just $5 with $50 purchase or any of the other items needed to make this project, visit my shopping site!

Now hop on over to Cat's Blog and see what she created with this fun stamp set!


Items Used to Create my Project - click any of the linked items below to take you to my shopping site.
Base and Bling Circle Pendant Silver
Base and Bling Circle Glass
Base and Bling Chain
Liquid Glass
Whimsy Paper Fundamentals
Glacier Cardstock
White Daisy Cardstock
Black Glitter Paper
Silver Shimmer Trim
Pixie Pink Ink
Artiste Cricut Cartridge (pocket)
Carmine Shinhan Touch Twin Marker
Clay Shinhan Touch Twin Marker
Cerulean Blue Light Shinhan Touch Twin Marker
Marine Blue Shinhan Touch Twin Marker
Sponge Dauber
Memento Ink (non-CTMH)

Thanks so much for stopping by today!  Stay crafty my friends!

Paige

Monday, August 19, 2013

FREE CCR File offer! Artbooking You are my Sunshine Home Decor for Heart2Heart Challenges

As part of my efforts to bring the best customer service and support to all who order through me and support my business, each month I will be offering a FREE CCR file exclusive to those who place an order with me that month!  This cutie-patootie 12x12 frameable home decor file will be sent by e-mail to all those who order through me in the month of August!  Simply place ANY size order through me or directly on my website at www.Paige.CTMH.com and I'll e-mail this file as a thank you for your patronage!

This week's "Song in your Heart" challenge at Heart2Heart Challenges had me stumped for a bit until I started flipping through Artbooking and the sunburst overlay popped out at me. You are my Sunshine has always been a bit of a family song for us so this one came together for me in a burst of sudden creativity (maybe a looming deadline played a part in it as well - LOL!).

Here it is framed and ready to put in my front room.  I love using these 12x12 shadow frames from craft stores for single page home decor layouts.  Its so much fun creating a seasonal picture to display for a month or two.  After you are done, simply put it in a page protector and store it in one of our Work in Progress 3 Ring Binders for the next time that holiday/seaon rolls around!

Here are a few detail shots.  The little wooden hear is from our Wooden Trinkets collection that I purchased a while back.  These pieces are my new go-to resource for adding just a little sweet touch to a project!


I sanded the edges of the Laughing Lola paper to get that nice white edge and help set it off from the light tan Glitter Paper.  A selection of retired (flowers, buttons) combined with newer accessories (chevron ribbon, wooden Trinkets butterflies) finishes up this project nicely!


I hope you'll join us at Heart2Heart Challenges this week and share the song in YOUR heart!  To play along simply use some Close to my Heart products in your project and link your photo thumbnail to the hop (very easy to do)!

Click on the links below to purchase the products used in this project:
Art Philosophy Cricut Collection (for the glitter circle and heart)
Frame (Michael's)
Flowers, buttons, brads, safety pin (retired CTMH)


Thanks for the space in your e-mail or for stopping by today!  I truly love sharing my artwork with you all and hope I've inspired you to get crafty this week!

Paige

Monday, June 17, 2013

Vintage Photo Frame with Quilled Roses Video Tutorial - Heart2Heart Challenges

We have an awesome vintage photo inspiration at Heart2Heart Challenges this week, roll on down to see the photo inspiration below!  I chose to use the colors and the 3-D nature of the inspiration piece for my Design Team project - an altered picture frame.  

I created a frame of Silver Glitter Tape on the front of the picture frame and then adhered my pieces on top of the Glitter tape.  I've found that sometimes when you adhere glue directly to plastic you can have your pieces come off when they dry - always a bummer after you've put time and effort into something.  I also used a sweet little altered clothes pin that I made a couple of years back and added a new sponged Artiste bird cut to the top of the clip.

Heart2Heart Challenge Photo Inspiration

Showing the 3-D roses (video below).
I created the frame for a picture of my Dad and me - right now I have a printer copy of the photo in it but the skin tones are a bit weird (hence me not posting it here).  I'll get a print done at Costco in the next week to replace it.  My Dad is in the hospital and I'm feeling blue that I'm so far away and  can't be there for him.  I'll probably be heading out for a visit within the next couple of weeks as its been way too long since I've gone home.  Sniff, sniff.


Still shot of the finished roses.

I hope you enjoyed my video!  I'm new at the video tutorial game so let me know what you think!

Now grab some CTMH supplies and create your own project for this week's Heart2Heart Challenge

Stay crafty my friends!

Paige


Saturday, April 27, 2013

Picture Frame Birthday Gift with CTMH Chantilly, Wonderland and Create a Critter Cartridge

This cutie patootie puppy frame is a gift for one of my kids to give to a friend for her birthday.  I love using the Michael's $1 picture frames and making them into something special as a keepsake of the party or the day.  
Our Glitter paper was the perfect accent along with some pinks from the Chantilly paper pack.  The blue background is our long retired Wonderland paper.  I used Create a Critter to cut out the decorations for the frame.  This one got a resounding "awwwwww" from my daughter so I hope the girl this is meant for likes it as much!  I'll be pairing this up with the Chantilly cupcake card I made last week. for a nice gift set.

Hope you are having a fabulous weekend!  We are getting rain all weekend after a gorgeous sunny week.  My morning walk turned into quite a moist experience so I'm hoping the sunshine comes back again on Monday.  The joke out where we live is how do you know its a Monday?  Because the sun is out again.  Seriously, I don't know why but we get a whole lot of crappy weekends after beautiful work week weather - just so unfair to the kiddos!

Stay crafty my friends,

Paige

PS - I'm adding this one to the Heart2Heart Challenge "Button it Up" from last week.  Don't you love it when you use your stash, make something cute AND get to submit a new piece of art for a challenge site?

Monday, April 8, 2013

Rain Drops Keep Falling on my Head - Mixed Media Canvas for Heart2Heart Challenges

Last month our corporate art department created a digital image to advertise the For Always paper pack on our websites.  I saw the ad and instantly fell in love with the adorable image of the For Always paper pack being used as clouds raining little hearts.  I took that inspiration and created a canvas for my own home decor for this week's challenge "Rain Drops Keep Falling on my Head" at Heart2Heart Challenges this week.  I think this is a great little inspiration piece for my home - especially as I live in the very rainy Seattle area!
I used some Gelatos on my canvas to create the gray and brown background.  I used my stamp scrubber pad to texture the ground and my finger tips to textured the gray skies to look like sheets of rain.
I stamped the hearts using our pigment inkpads in Honey and Crystal Blue directly to the canvas.  After they dried I added some Liquid Glass for shine and Stardust Glitz Gel between for a shimmery effect.
The girl is actually a witch from the "Frightful Affair" cartridge.  I cut off her witch's hat and cauldron - I loved those boots - perfect in honey with some Liquid Glass to look like rain boots for a fashionable lady.  The umbrella is from a retired set called Springtime stamped in Sweet Leaf and Crystal Blue pigment ink with Green Glitz Gel added to the dots.
I hope you'll join us at Heart2Heart Challenges this week and create your own "Rain Drops Keep Falling on my Head" project!  What a fun way to celebrate the April showers we all get - can't wait for those May flowers!

What went into this project?
Paper:  For Always Paper Pack, Honey CS, Vanilla Cream CS (retired)
Stamps:  A Rainbow, Springtime, Whoo's Your Valentine (mini heart) - all retired unfortunately
Other:  Stardust and Green Glitz Glitter Gel, Liquid Glass, Artiste Cartridge (clouds), Frightful Affair Cartridge (witch with cauldron modified), Heart Dimensional Elements


Saturday, March 30, 2013

Hanging Carrot Box with free CCR file

For our final quick and easy Easter project I created a giant carrot box to hang from a door knob or the back of a chair. This is a triangle box that I've left open at the top to add some green cellophane.  I'll pop the chocolate bunny in this one and leave it on the kid's door knobs for a morning surprise.  

You'll need one sheet of cardstock for the box and flower decorations (it cuts multiple flowers for use in other projects) and an 8x12" sheet of coordinating paper for the decorative front piece (my file cuts 6 per page of the front piece).  Here is our final Easter free Artiste CCR file:


I hope you've enjoyed my Easter Project Egg-stravaganza this week!  What projects did you make for Easter?  

Stay crafty my friends,

Paige


Thursday, March 28, 2013

Flower Cupcake Wrapper / Candy Holder with CTMH Artiste

A couple of weeks ago I was at Michael's and saw some adorable flower shaped cupcake liners - loved them but the price was high and if you are like me, whenever I see something cute I always think "hey, I can make that!"  When I started putting together my Easter project week I knew I wanted something like that but  hand made and inexpensive.  Boy was I happy when I found this little cutie on p.73 of the Artiste manual!

Here is the flower in profile.  I bent the petals out a bit by rolling them on a round barrel pen and added a set of leaves (p.32 Artiste Manual).
Each sheet of cardstock will cut 3 of the flower cupcake liners and the leaf sheet holds 9 sets of leaves.  I've put an empty cupcake liner inside and filled it with candy - you can pick it up and the liner won't fall out the bottom hole.  
Here's the link to the CCR cut file:


If you need to purchase the CTMH Artiste Cartridge, please visit my site at www.Paige.CTMH.com!

I'm on a tight budget this year so creating something fun/cute/functional out of materials that we already have at the house is an area that I get really excited about.  I love that I was able to use up a bunch of retired papers for my Easter goodies this year, have a bunch of cute things to surprise my kids with and had fun spending time in my craft room!  Are you having fun crafting for Easter?  What kinds of projects are you making?

Hoppy Easter crafting my friends,

Paige


Tuesday, March 26, 2013

Easter Egg Banner+ with free CCR Art Philosophy File

This fun banner was made using 6 sheets of cardstock plus 6 sheets of patterned paper.  I designed it so the letters alternate in rainbow colors so you can stack it like I've shown here or make one long banner.  The height of the eggs is about 8" tall by 6" wide.
You'll see on the cut file that along with the base egg tag shape I also cut letters and rolled flowers on the same sheet getting the most out of each sheet of paper.  The banner takes 11 eggs but a total of 12 are cut so here is what I made with the extra pieces.

Here's some close ups of the Easter banner so you can see the color combinations I used.  I matched the letter colors to pieces of retired B&T papers - lots of paper packs used here!
I used Hooligans, Cherry-O, Wings, Paper Garden and Heavenly Blue B&T - some of these are OLD!  It felt so good to use up stash while making something cute!
I kept the banner flat (no rolled flowers on it) for easy storage after the holiday.

Detail of the bow treatment at the ends of the banner using a bit of pink Baker's Twine I bought last year.

And here is the promised Cricut Craft Room (CCR) file that I have out on Google Docs:


  You'll need the Art Philosophy Cartridge in order to make this little gem of a project.  If you are in the market to purchase this cartridge you can stop by my Close to my Heart website at www.Paige.CTMH.com and have it shipped right to your house!  

This project will take the longest of all the projects I have for this week but outside of the cutting it should only take about 30 minutes to glue all the overlays and letters on and then thread the banner.  Rolling the roses for the separate bonus project will take a little time - I love using our new Quilling Tool to make these super fast and easy.

If you download my file and use it to cut I'd LOVE to see your results!  This week is our "So Egg-Cited for Easter" celebration at Heart2Heart Challenges so post it there and then let me know you used my cut file.  I'd love feedback / comments on what you think as I'm kicking around a couple more holiday ideas for this type of project fest!

Hoppy Easter Crafting my Friends!

Paige


Monday, March 25, 2013

So Egg-Cited for Easter H2H Challenge - Bunny Boxes with free cutting file

I'm "So Egg-Cited" to be the guest blogger over at Heart2Heart Challenges this week to introduce this fun Easter/Spring themed challenge!  Easter is very early this year - next Sunday, 31 March so this challenge is perfect for hopping to your Easter crafting, gathering supplies in your crafting basket and hatching up some fun projects just in time for the holiday!

I was so inspired by this week's challenge that I created a week's worth of QUICK and EASY Easter projects to share with you each day this week!  As a little gift to you, each day I'll post the project AND a free Cricut Craft Room file that uses either Art Philosophy / Artiste so you can just import the file and cut.  I'll keep each project to around 30 minutes so you can fit them into the busy week in time for Easter.  No fussing with sizes and I'll let you know about how much paper each project needs!

I have three kiddos aged 17, 14 and 11 so they are too old for the little kid stuff but still wanting the sweets and treats to celebrate the holiday.  I like to buy a few high quality treats and then put them in fun homemade packaging to make the day special for them.  These bunny boxes from CTMH Artiste are sized for about 2 Cadbury eggs or the equivalent in candy.  
I love the trendy new chalkboard look - so easy with a bit of Black Cardstock and our new CTMH Chalk Marker!
Close up of a bunny.  The Cashmere and Slate bunnies were sponged with ink and then I did some easy detailing on each - a bit of pink marker for ears and nose, some black sharpie for an eye and a white gel pen for a fluffy tail and eye sparkle. 
If you own the CTMH Artiste Cartridge, this cut is found on p.73 (Accent 1).  I used Cricut Craft Room to angle the box on my mat and blow it up to its absolute maximum size and cut it in White Daisy - 1 sheet for each box. After I removed it from the mat, I sponged Pear ink on to the two visible flaps that secure the box and look like a big hill the bunny sits on.  The two small sides of the box were decorated with 2.125 x 3.25" scraps of patterned paper.
Here is the link to the CCR Artiste Cartridge Cut File on my Google Docs - just download it and then go to your Cricut Craft Room account and select "Import".  You must own the Artiste Cartridge in order to use this file, if you don't have it yet you can order it by clicking this link to my website at www.Paige.CTMH.com.


I hope you'll hop on over to the Heart2Heart Challenges Blog and join us "Egg-Cited" girls as we craft our way to the holiday!  You need to use some CTMH product on your creation to join the fun so if your basket is empty then head on over to my website at www.Paige.CTMH.com and fill up on some new Spring goodies from our Idea Book!

Make sure you come back each day this week as I'll be sharing fast and easy Easter projects through Saturday all with a CCR file to make your crafting quick as a twitching bunny tail!

Hoppy Crafting!

Paige

What went into this project:


Friday, December 28, 2012

Cutie Purse with Artiste and Clementine


The different bags, boxes and treat holders (along with the hundreds of other images and coordinating stamps) make Artiste a winner in my book.  I love this sweet little purse that even has a separate pocket for the front you can cut - too adorable!

I used a couple of the Durables metal self-adhesive studs to make the front look even more like a purse and put a bit of Liquid Glass on the center flower medallion to cowgirl glam this up a bit!

Hope you had a craft-tastic day!

Paige

Tuesday, December 25, 2012

Merry Christmas! Plus a little Artiste Tree Treat Box


Wishing you all a very Merry Christmas!

 Enjoy the peace and good will of the season, the blessing of family and the joy of giving and receiving from those we love. 


I hope you all had fun opening your presents today!


My Cricut is a happy little bug today because I received a bunch of new products to play with for Christmas!  Fresh mats, a couple of cool cartridges I've had my eye on and the consultant preview copy of the new Idea Book that goes live on February 1st!  

Merry Christmas to all and to all a crafty night!

Paige - Stampologist

Monday, September 10, 2012

Rose Tote Box with CTMH Avonlea and Cricut Artiste

I know I've said it before but I seriously adore making the 3-D bags, boxes and flowers from our two Cricut cartridges - Art Philosophy had a bunch but Artiste has TONS of these cuts.  Here I've used our gorgeous Avonlea paper mixed up again with Smokey Plum to create a beautiful box perfect for gift giving.

This is the adorable gable tote box was cut to fit a page so the overall dimensions are about 4 7/8" wide x 2 1/4" deep x 4" high.
The rose and leaves were also cut with Artiste.  When I roll up my roses I'll often glue them, lightly spritz them with water and then take a heavy acrylic block and smoosh them down a bit.  This flattens the flowers out and helps curl some of the edges.  Its a fast way to get them looking more natural without fiddling with the individual petals.

I took a sanding block to the edges of the leaves and also ran a score line down the middle in order to sand a vein into the leaf.
If you'd like to make this project, click on the links below to purchase these products:
Bronze Glitz Glitter Gel (center of rose)

Thanks for stopping by today!  I hope you have a fabulous Monday to kick off a new week!

Paige


Thursday, July 19, 2012

Strawberry Boxes with CTMH Artiste Cartridge

My darling daughter is a strawberry crazed girl.  When spring time rolls around and the huge 4lb containers of them hit Costco, I buy two a week and we go through them all.  So its not surprising that one of the first projects I created with the new CTMH Artiste cartridge was a pair of the adorable Strawberry Boxes for my girl.
I cut these at 4.5" to get two to a page which is not as big as you can go for this box - I think the max is about 6.25".  Here is a shot against a ruler so you can see the size.  They are just right for a mini candy bar, a small baggie of candy, a pair of earrings, etc.  They'd be very cute to make tiny and put in a basket or to use as a table decoration/party favor for a summer themed party.  

I ran the cut shape through my Cuttlebug with the Polka Dot folder (I folded the cut out in half so it fit in one go).
I used a roll of jute twine I had to thread through the Cricut trimmed holes and then up through the center of the strawberry leaves and tied a bow on top.  Easy-peasy!  Love how adorable these look and that some very old Christmas paper I had worked PERFECTLY for the cute leaves!

I hope I'm wetting your whistle for the new CTMH Artiste Cartridge that is available on August 1st! 

Paige

Wednesday, July 18, 2012

Masculine Milk Carton with new Artiste Cricut Cartridge

I think milk cartons are the bomb-diggity for cool treat packaging.  I loved them when CTMH came out with their pre-cut ones and I was totally pumped when I saw the image on the Artiste Cartridge!  Perfect for party favors, gift giving or packaging up a special treat for your kid's lunch box.  The best thing about it being on the Cricut is that you can make everything from tiny ones for a handful of M&Ms or a big one like this to hold a gift sized amount.
On a smaller one-time use package I glue the whole top shut but on a larger sized package its nice to glue just a portion and use a paper clip or small binder clip to close up the lip.
During the Stampganza promotion I grabbed two sets I had my eye on "Country Life" and "Enjoy!".  I love how nicely they work together and give this project almost a French Country feel.
Close up of my paperclip tag.
I've only just begun using my Artiste Cricut cartridge and all I can say is that it is a MUST HAVE if you like to create gift items, host parties or decorate for the holidays.  There are some super sweet card bases, gift card holders (with the notches for the gift cards pre-cut) as well as lots of detailed images but the 3-D items are what make me swoon.  I'll be back tomorrow with some fun Strawberry Boxes I made for my daughter!

You can order your own exclusive Artiste Cricut Cartridge from me starting August 1st! 

Thanks for stopping by today!

Paige

Monday, May 14, 2012

Polka Dots and Stripes Challenge for Heart2Heart Challenges!

This week's challenge at Heart2Heart Challenges is a salute to trendy polka dots and stripes!  Get your spotty polka dotty fun on and create a project to share with us this week.  Want to step it up a design notch?  Add some stripes for flair and pizazz!

This week's challenge works perfectly with the new Close to my Heart special "Dotty for You" papers.  So perfectly our entire design team independently chose to work with these papers this week!  To get your set of 24 papers (2 each of 12 double sided patterns) for just $5 click this link to visit my online store! 

While you don't have to use this particular paper, you do need to use Close to my Heart products and mention the challenge site in your post.  Have fun playing this week and head on over to Heart2Heart Challenges blog to post your project using our Mr. Linky!


With the exception of the Milk Carton and the scallops on the roof, everything was cut with the AP cartridge - love that thing!  The roof was three layers of paper scalloped with our corner rounder.  I cut the Milk Carton with my new Bags, Tags, Boxes and More 2 cartridge so mine is slightly smaller (2.5" square at the base) than the CTMH ready to decorate Milk Carton which is 3" square at the base.


Paper:  Dotty for You (special - ends May 31 so hurry and get your 24 sheets for $5!), Kraft Cardstock


Thanks for stopping by today!

Paige


Friday, February 24, 2012

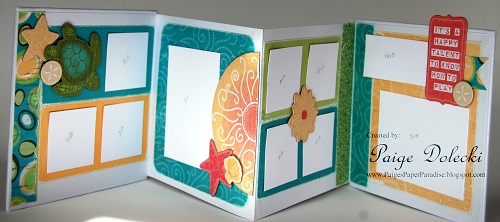
6x6 Accordian Album with Footloose and Compliments

This is the first project I made with Footloose and the coordinating Compliments Dimensional Elements.  Its taken almost directly from the CTMH corporate site where they post bonus projects you can make with leftovers from your Workshop on the Go kits.  Click here to get the cutting directions.

This is the view of the front cover, back cover and two interior pages of the folding accordian album (the front has Fun in the Sun and the Seahorse).


Here are the interior pages of the album:
 
I had enough printed chipboard to make yesterday's card plus a couple of leftover pieces for future projects - gotta love that!

To make this project, get these supplies:
Paper:  Footloose
Stamps:  Rustic Alphabet (for the word FUN)
Other: Footloose Compliments Dimensional Elements, 6x6 Accordian Chipboard AlbumSanding Kit
Related Posts with Thumbnails

Blog Archive

Copywrite - or sharing the love!

Thank you for visiting me here on my blog today! I hope you have been inspired by my postings to create something lovely for yourself! It does take me a whole lot of time to create the artwork, tutorials and posts for this blog so if you would like to borrow my wording or artwork then I respectfully ask that you e-mail me for permission, credit me and/or link back to my blog. Thanks for your understanding and respect!

Paige