Showing posts with label Banner. Show all posts

Tuesday, March 26, 2013

Easter Egg Banner+ with free CCR Art Philosophy File

This fun banner was made using 6 sheets of cardstock plus 6 sheets of patterned paper.  I designed it so the letters alternate in rainbow colors so you can stack it like I've shown here or make one long banner.  The height of the eggs is about 8" tall by 6" wide.
You'll see on the cut file that along with the base egg tag shape I also cut letters and rolled flowers on the same sheet getting the most out of each sheet of paper.  The banner takes 11 eggs but a total of 12 are cut so here is what I made with the extra pieces.

Here's some close ups of the Easter banner so you can see the color combinations I used.  I matched the letter colors to pieces of retired B&T papers - lots of paper packs used here!
I used Hooligans, Cherry-O, Wings, Paper Garden and Heavenly Blue B&T - some of these are OLD!  It felt so good to use up stash while making something cute!
I kept the banner flat (no rolled flowers on it) for easy storage after the holiday.

Detail of the bow treatment at the ends of the banner using a bit of pink Baker's Twine I bought last year.

And here is the promised Cricut Craft Room (CCR) file that I have out on Google Docs:


  You'll need the Art Philosophy Cartridge in order to make this little gem of a project.  If you are in the market to purchase this cartridge you can stop by my Close to my Heart website at www.Paige.CTMH.com and have it shipped right to your house!  

This project will take the longest of all the projects I have for this week but outside of the cutting it should only take about 30 minutes to glue all the overlays and letters on and then thread the banner.  Rolling the roses for the separate bonus project will take a little time - I love using our new Quilling Tool to make these super fast and easy.

If you download my file and use it to cut I'd LOVE to see your results!  This week is our "So Egg-Cited for Easter" celebration at Heart2Heart Challenges so post it there and then let me know you used my cut file.  I'd love feedback / comments on what you think as I'm kicking around a couple more holiday ideas for this type of project fest!

Hoppy Easter Crafting my Friends!

Paige


Thursday, February 3, 2011

Wings Workshop - Multi-page Layouts

One of the changes I recently announced for my Club girls is the start of multi-page layout directions to go with each Workshop on the Go kit that we do during club.  Each month I will come up with a minimum of 3 additional layouts to go with the two layouts shown in the Workshop brochure and will create a cutting diagram that can be used to cut all additional layouts in one sitting! 


Workshop Guests are welcome to join the fun by purchasing one Wings Workshop on the Go kit ($29.95) plus one package of Wings Level 2 Stickease ($4.95).  All but one of the these layouts come from the Magic how-to book ($29.95) which I highly recommend purchasing if you will be assembling layouts at home.

We will also be doing a button share (we'll split packages of buttons into sixths (72/6=12 buttons per person) to complete Layout #6.  We will split a package of RED, PINK, GREEN and BLUE in sixths = $3.97.  The clear buttons inside the heart (mine are on order so the layout is shown without) require a half package ($2.98). 

If you are unable to come but have purchased the kit through me, I will e-mail you a set of cutting directions (done in Word 2010) after the crop. Please note that additional cardstock will be required to complete all additional layouts (this can be purchased by the sheet through me during the workshop or you can use materials from your stash). Each multi-page kit will have 2 layouts featuring a Level 2 Stickease ($4.95).

YOU MUST PRE-PURCHASE ALL MATERIALS FOR THIS WORKSHOP CLASS

To purchase materials, contact me at Paige@MyCTMH.com.  I can accept credit cards and PayPal for payment.


Layout #1 (the Wings Workshop main layout)
Picture Sizes: 7x5, 5x4, 5x4, 5x4

Layout #2 - Bonus Layout from Wings Workshop
Picture Sizes: 4x3, 4x3, 4x3, 4x3, 3x3
Layout #3 - Based on layout shown in Idea Book
Picture Sizes:  5x7, 5x3.5, 5x3.5
Layout #4 - Using Stickease
Picture Sizes: 6x4, 4x3, 4x3
Layout #5 - Using Stickease
Picture Sizes:5x8.5, 4x2.5, 4x2.5, 4x2.5, 4x2.5
Layout #6 - Based on Idea Book 
Picture Sizes: 5x7, 4x4, 4x4, 4x4
Layout #7 - Based on a layout by a fellow CTMH consultant, Andrea Ruiz
Picture sizes:  4x3, 4x3, 4x6
Additional Items made with the Wings Workshop Kit (I still have some scraps left over even!)
Card workshop:  6 cards

Wings Banner (special instructions added to all Wings kits purchased in January).  I will have copies of the instructions for all people joining my workshop.

Saturday, January 8, 2011

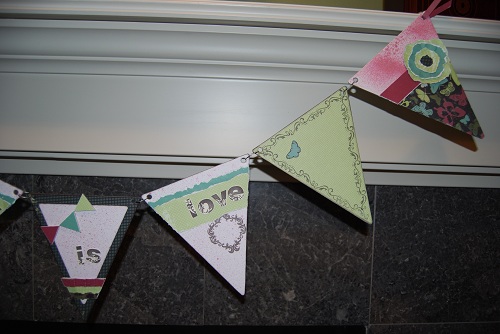
CTMH Family is Love Banner with Wings Paper

This banner is a BONUS project you get when your purchase the Wings Workshop on the Go during January.  You'll receive a full set of color instructions with cutting dimensions to put together one of our new pennant banners (just $5.95 for the pennants) using left overs from your Wings Workshop!  LOVE IT!   I still need to add some pictures to this banner (on segments 2,3,5 and 6 there is space for a snapshot or two).  I think this will make a darling Valentine's Day display!  One of the great things about these banners is that they fold up on those jump rings so you can store them in a gallon size ziploc bag.  That means you can make one for each holiday because the storage space is small!


Materials Used: 

Welcome Friend banner using new CTMH pennants, Wings and Find Your Style

Here is the banner project we will be creating at the 22 January Crop. This class will start at 2PM (to help you plan in case you can't make the whole day).

This banner was inspired by a post from a fellow CTMH consultant, Lisa Stenz, on our consultant bulletin board.  I've made a few changes but I really loved how she combined the Wings Workshop stamp with Find Your Style (Jan SOTM) on this banner!  We'll be learning several new techniques on this project:  how to mix and spray with our new Spray Pen, how to create accordian flowers and emboss resist. 


Related Posts with Thumbnails

Blog Archive

Copywrite - or sharing the love!

Thank you for visiting me here on my blog today! I hope you have been inspired by my postings to create something lovely for yourself! It does take me a whole lot of time to create the artwork, tutorials and posts for this blog so if you would like to borrow my wording or artwork then I respectfully ask that you e-mail me for permission, credit me and/or link back to my blog. Thanks for your understanding and respect!

Paige