Sunday, May 31, 2009

CTMH Tender Tags, June Stamp of the Month BLOG HOP with Bird Basics, April Word Puzzle

Welcome to our Stamp of the Month BLOG HOP for June featuring Tender Tags (set of 15) which you can get at a great discount or even FREE with order through June 30th!

This is a circlular hop so if you keep on clicking through to check out the great art provided by 42 different Close to my Heart consultants, you'll have done the full circle when you come back to where you started! I can't wait to click through and see all the fabulous creations from my sister consultants. We have some serious talent in this company!

To follow along on this hop you just need to click on the link at the end of the post on each blog to move along to the next site. Afraid you'll get lost? No worries! The list of all participating consultant sites is at the bottom of this post!

Everyone needs a tag set in their tool box of stamps and this set is such a sweet swirly set! I used one of the Tender Tags as a potted topiary tree on this card with the "Rock and Roll"technique. I started off with Sweet Leaf ink and inked up the entire stamp, then I "rocked and rolled" the edges of the stamp in Topiary ink and then stamped on White Daisy Cardstock. Tiny Cocoa CS pots finish off the look.

The little bird is from the April Word Puzzle stamp set. To get her pointed in the right direction, I stamped her and then cut her out, flipped her over and then decorated the "back side" with chalks (to get the blue body and yellow beak and feet). The back ground is also lightly chalked. Add some pop dots and all done! A simple and sweet card.

Products used:
Paper: White Daisy Cardstock, Cocoa Cardstock
Stamp Sets: Tender Tags, April Word Puzzle
Inks: Sweet Leaf, Topiary
Other: Soft Chalks, Round Sponge
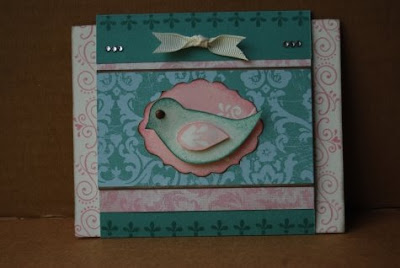

Bonus card! This is one of the new patterns in our latest cardmaking book, Wishes! The outer part of the card is like an open envelope and the insert (with pink swirls on the sides) pulls in and out. I love how interactive this one is!

The greenish-blue color is Juniper (the patterned Juniper paper is from Perfect Day) and the blush pink is from That's Amore. The sweet little bird is from Bird Basics and is sitting on a blush Tender Tag highlighted with Cocoa edges. A couple of sparkles from a Connection Club Reward and we have one "tweet" little card! I guess I had a bird thing going this month - must be all that wonderful sunshine thats been coming my way!

Materials Used:
Paper: Colonial White Cardstock, Juniper Cardstock, Perfect Day Level 2, That's Amore Level 2
Stamps: Tender Tags, Bird Basics
Ink: Juniper, Blush, Cocoa, Baby Pink
Other: Colonial White Grosgrain Ribbon, Connection Club Reward (found on the back of the Idea Book), Chocolate Brad

Now "Hop" on over to Pamela O'Connor's Blog to see her work!

Be sure to visit all the Consultants at their Blogs to get some great ideas! Remember, the June SOTM is only available until June 30th! Contact your CTMH Consultant (or click here) to see how you can get this stamp set at a discount or even FREE!

Got lost? No worries! Pick the blog hop back up by following this list of participating consultants! Happy Hopping!

Jena Devries http://www.livelovelaughscrapbook.blogspot.com/
Adeline E. Brill http://adeline-brill.blogspot.com/
Deb Young http://www.scrapbookczar.blogspot.com/
Chris Green http://www.createwithchris.blogspot.com/
Jennifer Patrick http://www.roxybonds-scrappin.blogspot.com/
Chris Shouse http://www.houseostamps.wordpress.com/
Alanna Moses http://www.damoses.blogspot.com/
Haley Dyer http://www.inkyscrapper.blogspot.com/
Jen Rubio http://www.jenrubio.blogspot.com/
Kami Welter http://www.scrappin4memories.blogspot.com/
Caren Goldsein http://www.scrappycaren.blogspot.com/
Laurie R Newton http://scrapsfromthebeach.blogspot.com/
Reba Poquette http://www.thedirtyscramper.blogspot.com/
Nona Davenport http://www.nonapearl.blogspot.com/
Misty Jackson http://www.misstscraps.blogspot.com/
Julia Menssen http://www.ralphandjulia.blogspot.com/
Anne Beck http://www.anniemuses.blogspot.com/
Jamia Bankhead http://www.papermadnessinc.blogspot.com/
Dawn Ross http://www.iamahappystamper.blogspot.com/
Sherry Thompson http://www.picturespatternsandpaper.blogspot.com/
Laura Dame http://www.thecroppersconnection.blogspot.com/
Lucia Grabb http://www.luciasscrappinandstampin.blogspot.com/
Nancy Ball http://www.ballisticdesign.blogspot.com/
Shannon Laux http://www.rockinstamps.blogspot.com/
Melissa Laverty http://www.fancymelissa.blogspot.com/
Terrie Dodd http://www.my-life-in-real-time.blogspot.com/
Mindy Eggen http://www.creativevalleycreations.blogspot.com/
Helen Onulak http://www.hookedonstamping.com/
Ronnie Crowley http://www.ronniecreates.blogspot.com/
Karen Strous http://karensctmh.blogspot.com/
Jaime Benavides http://www.scrapcrazydiva.blogspot.com/
Kelly Triggs http://www.stampinallday.blogspot.com/
Lori Miller http://www.clearlyfromtheheart.blogspot.com/
Brae Montgomery http://thebrae-er.blogspot.com/
Shannon Pelletier http://www.shannonmvt.blogspot.com/
Wendy Kessler http://www.myscrapbookingblog.com/
Paige Dolecki http://www.paigespaperparadise.blogspot.com/
Pamela OConnor http://www.cherishyourmemories.blogspot.com/
Shari Odut http://stampinshari.blogspot.com/
Tammy Lea Pinchard http://www.creativeimpressions-pinchme.blogspot.com/
Dawn Heuft http://www.stamptildawn.blogspot.com/
Cibele Glazer http://www.flowerfoot.blogspot.com/
Sarita Schraeder http://www.blessedscrapper.blogspot.com/

CTMH June Special Deal-A-Day! FREE CTMH Products!


Raise your hand if you like to get stuff for free!

If you are like me and love a great deal then get ready for June on my website! Every single day in June Close to my Heart will post a new special! On 24 of the days there will be "buy an acrylix stamp set (size A,B,C,D,or E) and get an item for FREE! Not only that - shipping is reduced to just $3~! The special will run from 9AM to 8AM the following day - 23 hours to get that great FREE product!

On 6 days there will be a "MYSTERY BOX" that is both current and retired products discounted by at least 50% with shipping reduced to just $6-$10 per box depending on value. One of the days will have a box worth $300! Each of the 6 boxes will have a different product focus so you can get all 6 and not get huge repeats.

If you are a local customer then I've got a fun thing for you! Anyone who purchases a "Mystery Box" will be invited to a swap at my house in July! So if you get a duplicate of something you already have or if a product just isn't your cup of tea, then bring it to the swap and have some fun! More details will come on this as we get into the sale! Sounds like a party to me...

CTMH Stamp of the Month (SOTM) BLOG HOP June Tender Tags - Coming TONIGHT!

Get on your frog feet and get ready to HOP! In just a couple of hours I'll be posting a new article featuring 2 sweet (or should I say Tweet - hint, hint) cards using Close to my Heart's June Stamp of the Month (SOTM) called Tender Tags. The very best part is that in my post I'll be linking to 41 other Close to my Heart Consultants who have also been busily working away to blow you away with some amazing artwork! I'm SOOOO looking forward to circling around and seeing all 42 sites and getting more ideas to use for this stamp set! I'll be participating in this hop every month and next month's hop is already shaping up to be even BIGGER! Talk about one stop shopping for a ton of great ideas!

The blog hop will go live at 11:01PM Pacific Time so get ready for some great hopping!

Saturday, May 30, 2009

CTMH Memory Keeper Box and matching CTMH 9x9 accordian album by Two Peas

I found a great You Tube video done by the girls over at Two Peas in a Bucket that takes you step by step through making a painted Memory Keeper Box and matching album. I haven't tried painting these boxes yet. I've done lots of inking but this looks really neat so I'll be trying this soon! I hope you enjoy this tutorial!

You Tube Video - watch it here!

CTMH Green Eco-Friendly Paper Crafting and Sustainable Forestry Initiative Certified

I'm a mother of 3 kids and I live in the very eco-aware Pacific Northwest. Having a child with a brain tumor makes me even more aware of our environment and how it can impact the very cell structure of our bodies so I try very hard to choose products in my home that are organic and/or have low impact on the environment/people. The latest issue of Paper Crafts magazine was focused on this topic and I just wanted to share a big kudos for Close to my Heart that was published in this magazine (July/August 09 issue).

Most of you probably know already that Close to my Heart manufactures all of its Acrylix stamps here in the US and that we give a portion of the profits from every stamp set sold to Operation Smile but did you also know that ALL of Close to my Heart's papers - our B&T Duos (the patterned paper), our white core cardstock and our Stickease cardstock stickers - are all Sustainable Forestry Initiative (SFI) certified? This means the pulp used to create the papers comes only from certified sustainable forests. Way to go Close to my Heart!

They also posed a question to their team of expert designers asking how people can save money and save the earth at the same time (page 16) and one of the designers answered: "Purchase items in a coordinating kit. Kits not only save you money, they also help you avoid buying excessive supplies. When you are finished with your project, turn the leftovers into quick cards and tags." Wow - I couldn't have said it any better! One of the reasons I love CTMH so much is that I know whatever comes in my Level 2 or Level 1 kit is going to coordinate perfectly together. I don't have to go out and buy 30 different papers trying to get the right mix or the right colors - the perfect pattern balance is already there and because all the papers are coordinated I can use every little scrap!

I am very proud to represent this great company. Most people don't get to make huge sweeping changes in the world - we can't all be the president, a great author, a CEO. BUT we each have the power to make our little corner of the world a better place for our families and our communities through our everyday choices. It makes me feel even better about my hobby and being a Close to my Heart consultant knowing that the company I represent not only has beautiful value driven products but that it also believes in giving back to our communities through Operation Smile and helping our enviornment through using Sustainable Forestry Initiative certified products!

Paige

P.S. If you do get Paper Crafts magazine or if your local library carries it, also check out page 38 to see the wonderful card made by Tresa Black, a very talented CTMH consultant. She combined Animal Cookies and a stickease image from Stardust to make an fun boy card!

Friday, May 29, 2009

CTMH Altered 9x9 Chipboard Album and matching CTMH Memory Keeper Box with CTMH Silhouette Paper and Simply Snapshots Gift for Graduation

I made this set at my MIL's request for her to give to a co-worker who is graduating from college. I really like the way it turned out!

I've used our terrific Memory Keeper 9x9 box which comes as a flat packed box that you pop up and push the front in to make a box. The best features of this are: its White Daisy so it takes ink true to color, the front lip has a nice strong magnetic closure across the entire front, you can choose not to permanently adhere it together if you want a seasonal box or birthday box to fold flat after the celebration, it perfectly fits our 9x9 chipboard accordian album and the price is right at just $6.95!

Here I've used our Silhouette Level 2 paper pack for the exterior of the box - very classy don't you think?

I've embossed the front in our Silver embossing powder which is a nice bright metallic against the black paper. I also like our Silver Pearl which is a much softer pearly silver but this one seemed the right fit for this box.

This shows how it looks with the 9x9 chipboard album inside. You can also paper the interior of the box.
Here is the album side by side with the Memory Keeper box. The 3-d embellishments are from Target. Now, I usually am pretty darn exclusive to CTMH products because I love the color coordination but I found these 3-d embellishments in the dollar section at Target, they pretty much matched the classic colors of Silhouette and to be frank, I was in the middle of a really busy time so I was trying to finish this off and ship it out very quickly.

You can't get much easier than using Simply Snapshots for the interior of the album! These are sized at 9x9 already so all you have to do is adhere them to the accordian pages and you are done! I like to put them both horizontally and vertically so people can use all the pictures from an event.

Here is the back side of the album showing the two covers. The back page is a treasure pocket with one of the Simply Snapshots cut in half and the tops embellished for pull-out cards.
The entire thing went together in one morning so it was a quickie but very nice project! If you use other cardstock for the tags in the treasure pocket you can get two of these albums out of one package of Simply Snapshots and one Level 2 paper pack!

Materials used:
Stamps: You Did It, Chocolate Alphabet Large (name on front), Friendship Alphabet (for numbers - this was a special a couple of months ago), Key to my Heart (large corner swirls on the box - this set was a special a couple of months ago)
Other: Silver Embossing Powder, Memory Keeper Box, 9x9 Chipboard Accordian Album, Target Graduation 3-d embellishments

Wednesday, May 27, 2009

Baby Card with CTMH Daydream Paper, Ms. On the Go, Watercolor Pencil Technique and Wishes Cardmaking Pattern

I finally had a chance to play with this great stamp set "Ms. On the Go" the other night to create a card for a friend who is due soon. I love how you can color the mommy in to match the person you are sending the card to, such a nice personalized touch!

This is one of the new 4.5x4.5" cool square cards from the new Wishes book. As you can tell from my previous post I really love our books (LOL). I'm totally a more-bang-for-your-buck kind of gal so I love helping people maximize their dollars.

The card is not high on bulky bling as I'm sending it in the mail. I used our Daydream paper pack and cut one of the wavy strips off a full 12x12 sheet and then put two of them back to back to make the 2" strip in the center. The primary image is from Ms. On the Go colored in with watercolor pencils and a blending pen.

Ah, watercolor pencils.... Such a great tool! They can truly make you look and feel like an artist. I can't draw very well (my mother painted and minored in art in college and my brother is an architect so I know my drawing skills are not up to snuff) but stamping makes me into an instant artist! You use watercolor pencils just like regular coloring pencils but when you are done coloring you take a clear marker called a blending pen and go over the image - it is moist so it blends all the coloring into a nicely painted look. I like to go darker around the edges and then lighter in the center of the image so it looks a bit shaded as well. Very fun tool in your tool box!

Materials:
Paper: Daydream Level 2 Paper Pack
Stamps: Ms. On the Go, Family Ties - Adults, Family Ties - Children (for mama and baby)
Inks: Black, Hollyhock
Other: Watercolor pencils, Blending Pen, Black Bitty Brad, Paper Piercer

Talk about getting a nice surprise first thing in the morning! Yesterday I was checking my e-mail between sets of kids going off to school (I have middle school and elementary kiddos) and found a message telling me that I'd won a Lemonade AWARD! How exciting! I don't think I've won an award since I left the 9-5 business world with my newborn (now almost 11 yr old) 2nd child! Then to make it even better it was from a sister CTMH consultant Brae Montgomery who has been an inspiration to me with her artwork postings on the consultant website since I began 1.5 yrs ago! But wait, it gets even better... Checking my mail last night before bed I found another Lemonade Award from another talented sister CTMH consultant, Dawn, who I just met recently in cyber-sphere. Wow, what a great day! Thank you so much ladies, I'm totally feeling the love....

The rules of this award are as follows:
- comment on this blog
- cut and paste the award logo and use it on your own blog"
- nominate 5 to 10 blogs you feel show great attitude and gratitude
- link to your nominees within your blog post
- comment on their blogs to let them know they received the award
- link back to the person who gave you the award to show your appreciation

So here is my list of 10 (two awards so I have to do double) blogs I find creatively inspiring from some pretty cool women I'd be glad to share a cup of coffee with .....

Kimberly (my good buddy in the real world as well as cyber space)
Melissa (Have you ever found someone who was so generous with their talent and knowledge that you couldn't believe how lucky you were to meet them? Melissa ROCKS!)
Aaron (she's an absolute genius at cardmaking and altered projects and has been incredibly helpful on the consultant boards sharing her amazing artwork and answering questions)
Kathy (Another card genius - I'd love to have her as grandma to my kids! Can I adopt her?)
Nellie (Isn't she so sweet?)
Sherry (She asked a question that sent me in a new direction!)
Misty (Are you up for a challenge? Then visit Misty!)
Leslie (Check out her cute cards! Her "funny story" brought tears to my eyes so make sure you hit some of the older posts!)
Kelly Jo (Rockin color challenges - I've been drooling over the work so I really need to start playing!)
Halley (check out the SHIRTS she made for her daughters using the May SOTM!)
You ladies rock!
Paige

Monday, May 25, 2009

Why I love CTMH Originals and CTMH Wishes Cardmaking How-To Books


Its all about the math baby! Think about it, every time you need a card what do you do?

1. Drive to the store Cost: $2.00 in gas and 10 minutes of time
2. Pick out a card Time: 20 minutes to find the right one
3. You brought your kids Cost: $7 in extras you weren't planning on getting
4. Cost of card Cost: $2.50 for a cheapie or $5.00 for a nice one
5. Drive back home Cost: $2.00 in gas and 10 minutes of time

Totals:
Time: You've probably spent a good 40-60 minutes going to the store, picking out a card, getting a few extra items and then getting back home.
Cost: If you are able to get out of the store with NOTHING else but a card you've probably spent about $6.50 for a cheap card to $9.00 total for a higher priced card. If you brought a kid along or tend to throw a couple of things in the cart because you are there then you've probably spent at least $15+ on that quick trip to the store to get a single card.

Now lets mutliply that. How many cards a month do you get? When I ask this question people usually reply about 2-4 for non-holiday months. That's birthday cards, anniversary cards, get well soon cards, sympathy cards, thinking of you cards, etc. We're not even talking about Mother's Day, Father's Day, Teacher appreciation, winter holidays, etc.

Average of 3 cards per month:
Time spent: 2-3 hours going to the store each time to get a card.
Cost: $19.50 to $27 minimum (no extra purchases at the store)

Price of Originals: $29.95
Price of Wishes: $29.95


How many cards does it take until you "break even" on purchasing one of our cardmaking books? About 2 or 3. Yes, that's right - about 2 or 3 cards and you've broken even on these books! The average person breaks even on this book within the first month or so of owning it!

Why do I love our cardmaking books so much? Because they contain between 85 (Wishes) and 99 (Originals) recipe patterns with all the cutting dimensions and assembly directions to make your cardmaking go FASTER, SIMPLER and EASIER. You don't have to worry if the card is going to look nice because you can see from the pattern that it will be artistic and have good balance. We even give multiple examples of how to make the cards so you can see how it looks with different papers and embellishments. They take all the hard work out of figuring out how to cut your paper and let you have all the fun - the embellishment! I always say they are like the perfect white bread recipe that comes out great every time and then you add your own herbs and spices (your embellishments) to make the card your own.

So your next question is probably, "Paige, how many cards can I make with one paper pack?"
Well, this past November I held a Holiday card workshop where we made 42 cards with HALF a Level 2 paper pack and one package of our White Cards and Envelopes Value Pack.

Cost: $12.95 Level 2 Paper Pack (only half used)
$14.95 for Card Base and Envelope Value Pack of 50 (some left over)

I added a bit our our Bulk Grosgrain Ribbon (great value in these 20 yard rolls) and some brads (packages of 100 for $4.50) and the some stamping (I used a couple of different sets but you could easily do this with one or two sets you loved) and two or three coordinating ink pads. We made 7 different designs with 6 cards of each. This workshop was a huge hit and lots of fun to do with my ladies. If you want to see what we made check it out by clicking here.

So now you ask, "But Paige, I don't live near you, how can I do a workshop like this?" and I'm going to say - buy Wishes! Our newest offering has 3 bulk card workshops! You can make 8, 12 or 16 cards with one workshop! Each workshop features 2 each of x# cards - so the 16 card workshop is 2 each of 8 different cards. Perfect for doing a bunch of holiday cards OR get a terrific stamp set like "Say it in Style" and you can have a variety of cards like Birthday, Anniversary, Get Well, Thank You, Mother's Day, etc. ready to go at a moments notice!

I hope this helps you "do the math" on why I love our cardmaking books so much! I know once you have one you will love how easy and quickly your handmade cards come together. And a handmade card is more than just a piece of paper, its a little gift of love you give every time you send one. It says to the person who receives it that you are thinking of them and care about them. They don't wind up in the recycle bin two days later. People keep them and smile and feel the love every time they touch them. And that is why I LOVE our BOOKS!

Sunday, May 24, 2009

CTMH Flower Pot Card Tutorial with Tickled Pink Stamp Set and Boom Di Ada Creative Basics


This adorable flower pot card was made as a Mother's Day card at two of my home parties in May. I just love the way it came out! We made it with both a Hollyhock and a Sweet Leaf flower pot and both looked adorable but I gave away all my Sweet Leaf examples! I promised one of my dear friends/customer that I would post some directions so she could make some more at home.


Basic Directions: Pot is 3.5"x9" piece of Hollyhock Cardstock
- score at 2” and at 5.5” and fold like a Z (see picture)


- line up the 2” lip score in your paper trimmer so the trimmer blade hits right at the 2” score line and the folded bottom pot angles out to the .25” mark (you'll be cutting a tiny long triangle off each side of the bottom of the pot to shape it – see picture for pot shape).

- decorate the 2” lip of the flower pot. I used our corner rounder to make a scallop as is shown in our Spring 2009 Idea Book (page 27). Then I punched some holes using our long reach punch and added a little tag from our Post Marked set with a Garden Green Brad.

- There is a narrow .5" strip of Boom Di Ada Creative Basics striped paper on the top lip of the pot that just peeks out underneath the flowers.

- The base of the flower pot is stamped with one of my all-time favorite background stamps - Argyle! Lots of fun textures including polka dots! Best part is you can line them all up and make a full and complete argyle texture with these by layering the colors.

Flower insert card: 3”x4” Hollhock base and 2.75"x3.75" Colonial White inset.

- I rounded the corners on the TOP ONLY of the Colonial white and the Hollyhock CS. I did this so they wouldn't peek out behind the adhered flowers.

- Stamp a sentiment on the Colonial White CS and adhere to the Hollyhock backing.


- Put the card into the pot and attach the first center back flower directly to the insert card. The next two flowers attach on either side with some pop dots right where the insert hits the flower pot. This gives it a little lip that will help the flowers keep the card closed and make it easy for you to pull the insert card in and out.

- I stamped three flowers using the wonderful Tickled Pink set (available until the end of May 2009). This set is wonderful for ink layering by stamping the big flower in Blush, a small center in Olive and then the medium flower in Hollyhock it gave the flowers a 3-D look without cutting and popping each section.

Assemble:
- Tie a Colonial White Grosgrain ribbon around the whole thing - about 11"- 12" and then trim. There is NO ADHESIVE on the flower pot part - it is held together by the ribbon.

- Add bling as desired! I put some of our Sparkles on the center of each flower and the little tag on the cards I sent out to my Mom and MIL for Mother's Day.

- If you want to mail it in a standard size envelope just keep the height to under 5.5” or use a bigger envelope if your flowers go wild! If you are adding bling you might want to go to a bigger envelope and then put either a folded paper towel or a piece of cardboard in the envelope to keep the bling from poking through.

Materials List:
Paper: Hollyhock Cardstock, Colonial White Cardstock, Boom Di Ada Creative Basics
Stamps: Tickled Pink, Post Marked, Argyle
Inks: Blush, Olive, Hollyhock
Other: Sponge Dauber, Garden Green Brad, Colonial White Grosgrain, Corner Rounder, Long Reach Hole Punch, 3-D Pop Dots, Tombow

Saturday, May 23, 2009

CTMH Make A Father's Day Gift Photo Wallet with Back Country Paper

How would you like to make a unique and low-cost (or FREE) gift for Father's Day? On Friday, 5th June I'll teach you how to make a Father's Day photo wallet using the new Back Country paper pack that is perfect for any Dad in your life! To see a slideshow featuring this project click here: http://paige.myctmh.com/MyCTMH/MyArt.aspx?HighlightID=1073306

When: Friday, 5th June at 7:00PM
Where: Paige's House - (RSVP for directions)
RSVP: Deadline is Wednesday, 3 May by reply e-mail or phone at (425) 396-5043
Cost: $5.00 or FREE (see below)

To find out how you can join the fun and get this workshop for FREE then keep on reading!

I am very excited to announce a brand new style of club that is starting in June! Up until now my clubs have been a traditional 6/25 menaing that for 6 months, 6 members committed to spending $25 each month and took turns being hostess of the month and earning rewards. We met once a month for a club crop at my house and had lots of fun creating together. Sometimes people wanted to join in the middle of a club and I just didn't have an open spot for them. Now I've found the perfect solution - and "OPEN" Girls Night Out Creative Club which allows anyone to join at ANY TIME with NO MONTHLY commitment! Let me share with you the details of how this club works:

We will meet at my house on the 1st Friday of each month at 7:00PM (starting on Friday, 5th June). Anyone can join me for a Creative Club Class night at any time with no monthly commitment - just an RSVP to hold your spot! Each month we will make a project for a $5 supply fee (could be cards, gift item, layout, etc.) If you place a $25 minimum order then the project will be FREE and you will have your name added to the hostess list! The person at the top of the list will receive the hostess rewards for the month. I will let you know the month prior if you are up next to give you the opportunity to host a party and increase your rewards! Skip a month and your name moves to the bottom of the list. Place a $25 minimum order by the 1st Friday of the month (whether or not you can attend the Creative Club Class) and your name will rise another notch on the list closer to hostess rewards! The best part is, you can even purchase the Kit of the Month scrapbooking class supplies with your order and come back at the end of the month for a FREE workshop!
Perks of Creative Club:
$5 or FREE Creative Club Class
Free current Idea Book
Hostess rewards during your month
Opportunity to host a party and increase your rewards
Low cost night out with the girls
Bring a friend incentives (each friend must have an RSVP and not be on my e-mail list)
Purchase your Kit of the Month supplies with your order!

Interested in the Kit of the Month? This month's kit will be the bear-y best! We'll be doing Back Country - perfect for all those camping shots, photos at Rattlesnake Lake or Mt. Si! Check out a video slideshow here:
http://paige.myctmh.com/MyCTMH/MyArt.aspx?HighlightID=1073218
for full details see My Calendar here:
http://paige.myctmh.com/MyCTMH/Events.aspx?PageID=183&eID=525394

This kit is the perfect compliment to the June Creative Club Class project and is sure to get your summertime creativity off to a great start! If you have any questions about Creative Club, the Kit of the Month or any of our terrific products then just send me a note or give me a call!

Products used for Photo Wallet - all CTMH:
Paper: Back Country Level 2, Cocoa Cardstock,
Stamp set: Campin' Fever, World's Best Dad (April Stamp of the Month for front sentiment)
Inks: Desert Sand, Olive
Tools: Embossing Stylus, Stipple Brush
Related Posts with Thumbnails

Blog Archive

Copywrite - or sharing the love!

Thank you for visiting me here on my blog today! I hope you have been inspired by my postings to create something lovely for yourself! It does take me a whole lot of time to create the artwork, tutorials and posts for this blog so if you would like to borrow my wording or artwork then I respectfully ask that you e-mail me for permission, credit me and/or link back to my blog. Thanks for your understanding and respect!

Paige