Showing posts with label Studio J. Show all posts

Saturday, July 13, 2013

Studio J Big News - Use it for custom photo processing at a GREAT price!

Big, big news on the Studio J front!  They just updated the software which allows you to do a couple of very important things - you can now add and delete photo wells on their pre-designed layouts AND you can use the blank page layout to create custom sized photo sheets, journaling blocks and even add journaling and digital designs right to your photos!  You HAVE to watch this video (if you get this via e-mail click out to my blog so you can see it) to check out the new ways to use Studio J!


Below is some pricing information on Studio J.  You can get a two page layout for $6.95 which is just $3.50 for a 12x12 sheet of our incredibly high quality processed (not printed) silver-halide developed pages.  You can do panorama shots, tiny 2x2 shots, 6x6", 8x10" prints and so much more.  Silver-halide process is considered the highest standard in photo developing industry with "100-year+ quality".  It has been tested and used by the top photo labs in the world so your pictures will be BEAUTIFUL!  I've had several sets of layouts printed through Studio J and they are always amazing to look at!

PURCHASE OPTIONPRICE
Per two-page, custom-printed layout (including JPG files)  $6.95$6.95
Per two-page JPG file only   $2.95$2.95
Shipping per box of up to 50 layouts  $5.95 US$5.95 US / $13.95 CAN
Minimum layouts per order  44

Thursday, December 30, 2010

Finished my Christmas scrapping with CTMH's Studio J

Okay, I know I've said it before but I LOVE STUDIO J!  I had a couple of free hours yesterday so I sat down to work on my Christmas scrapping.  My goal was to get 4 layouts done (you know, for the free shipping each month) and wound up doing 6 layouts and finishing my Christmas scrapping for 2010.

This one is my favorite - my oldest and youngest making a gingerbread house together.  We found kits at Trader Joe's this year for a simple A frame house that had all the decorating supplies and the royal icing powder included.  I helped Eliza make the icing and showed her how to put it into a pastry bag then she and Devin had a blast putting it all together and decorating it.  On a side note we tried eating a piece after Christmas but the house parts did NOT taste good.  We decided next year to bake gingerbread cookies and just use the kits for decorating fun!

Here are just two of five Christmas morning layouts I did with the Mistletoe kit in Studio J.  The pictures really capture the excitement and joy of Christmas morning - all those wonderful goodies just waiting to be opened! 

Check out the right side of this page - do you see the picture of me on the lower left?  That's me opening up my NEW BIG SHOT PRO!  I was super excited to get one of these machines (at a rockin discount in the Black Friday sales) and several dies for it.  I can't wait to share some fun projects I have planned out for the new year using my new gadget!

Love this shot of my three kids all together!

Studio J is such a great tool for getting caught up - or in my case, staying current with your scrapbooks.  I've done a great job getting all of 2010 scrapped now I just need to start importing more of my older pictures to work on the backlog!  To check out Studio J click here so you can see how inexpensive (just $6.50 for a two page layout for members) and easy (EVERYTHING is included in the price - no nickle and dime costs for paper packs or embellishments) Studio J is!

Tuesday, November 30, 2010

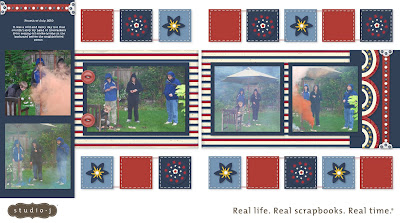
Studio J Layout - 4th of July with Tutorial for making multicolored lines of objects

Phew, I managed to get my Studio J layouts done for November!  Nothing like waiting until the last day of the month, hunh?  I wound up with 6 new layouts (yay me!) and I made an extra copy of my daughter's 14th b'day layouts to put in a book I'm sending to her grandparents for Christmas.  Its so easy to do multiple books when all you have to do is click on a box instead of trying to create a whole extra layout!

Tutorial

This month I had an absolute blast playing with "copy" and "paste" in Studio J to create both lines of stitching (see the boxes above) as well as multicolored lines of brads.  To make sure everything gets evenly spaced, once you have selected your items (use the shift key to select multiple items), a box with several options for lining things up pops up - these will allow you to center your items perfectly both across an area and in relation to eachother.  Very handy little tool!

To get multiple colors of the same type of item, there is a check box that comes up when you select your color - you can choose for each of the same item on a page (like brads in the above layout) to all be the same color OR there is a box to check for "only this item" to be colored as selected.  I chose this box and then created a multi colored line.  After I had my first section of colors, I simply used my shift key to select the line and copy and pasted away to get huge lines of multicolored brads - fun and easy!

I know the pictures in these layouts are very gray and smokey.  It was a drizzly, gray day this past 4th of July and we were setting off smoke bombs so everything came out with a haze.  I was able to brighten up a few pictures by using the Studio J photo editing software.  I really love it for popping the glare off of glasses as well as fixing red-eye! 

Thanks for stopping by!

Friday, November 12, 2010

CTMH Studio J Layouts using CTMH Zippidee paper


These layouts are from my daughter's 8th grade play.  They put on a production of Rikki-Tikki-Tavi that was really adorable.  I was enlisted by the drama teacher to do the monkey face painting which was a lot of fun and allowed me to be backstage to get some great "getting ready for the production" kinds of shots.  I really wish the large picture of my daughter bowing on the second layout was a bit crisper but it was the best of the bunch.

I played around with the paper colors for this set of layouts A LOT.  One of the fun things I discovered is that you can adjust how strong the pattern comes through when you custom color the background and texture paper.  The black paper on the 2nd layout is actually one of the star papers, I changed the colors and adjusted it darker (there is a sliding percentage bar I used) so the stars are just a bit visible on the real life layout.  I wanted a very subtle background that wouldn't take away from the pictures but would support the whole "star of the show" kind of theme.

This is the end of the 6 new layouts I did for October so I'll start working on my November order now.  I've also got lots of items from my last two Christmas themed Stamp Camps to share as well.  I'll do a photography shoot soon for those.  I came down with some kind of virus last night - hit me like a ton of bricks all of the sudden.  My hubby is working from home today so he could get the kids off to school for me (that says how sick I was last night/this morning because I NEVER ask him to do that).  Worst part is I'm supposed to be testing at Martial Arts tonight!  We have 5 people going for their black belts or their 2nd degree black belts tonight so its going to be a killer and LONG test.  I have until 5:30PM to start feeling human again and decide if I can push myself through a 3 or 4 hour test.

Tuesday, November 9, 2010

CTMH Studio J Easter Layout - Tutorial on adding lines of stitching to your layouts

This adorable Easter themed paper pack is one of the paper packs that was developed exclusively for Studio J (there is one new Studio J only pack for each Idea Book release).  I love the sweet vintage feel Easter themed stickease that came with this kit - see those cute little bunnies?  On this layout I did a lot of resizing of stickease as well as layering stickease to create clusters of embellishment.  The egg cluster on the right side page was created by resizing and layering (use push to the back and bring to the front buttons) and the flower scroll on the left side is a scroll with an extra stickease added on top.  I also added two clusters of buttons as well as some stitching which is so easy to do! 

This little tip was taught to me at a Close to my Heart event by the guy who is in charge of Studio J. I was so excited that I told my friend I was sitting with that this tip alone was well worth the fee to attend the event! On the layout above I added just a couple of stitches but now that I know how easy it is to add a whole sections I'll be stitching away on my Studio J layouts from now on!


TUTORIAL for adding lines of stitching to your Studio J Layouts

To add stitching to your Studio J layout simply go to your embellishments tab in the left side options bar and select buttons.  Select whatever size thread and shape thread you would like (we have straight stiches as well as cross stitches).  Then drag that selection to place it on the layout. 

Do you  want to do a whole line of stitching?  Put down two or three of your selected stitches and align them as you'd like.  Use your Ctrl key to select the group by holding down and clicking on each element like you normally do with almost any program. 

Now, look at the top bar above your layout.  There is a menu bar that says "zoom, move, undo, redo, copy, paste, snapping-on".   Select copy and you'll get an identical group of stitches to place on your layout.  You can keep doing the copy feature to get a larger line to quickly go around an entire page or section.  If you have extra stitches hanging over simply remove the excess by clicking on the individual stitches you'd like to remove and putting that element into the trash. 

Isn't that cool?!?!  I'll definitely be doing this on my November order of Studio J layouts!

Sunday, November 7, 2010

CTMH Studio J Layouts using CTMH Back Country

Did you know that you can use any of the patterend papers for your journaling and title boxes in CTMH's Studio J?  Here I've used the same plaid paper that is on the bottom in both the title and journaling box but changed the color to a light blue so you could read the text. 
 

One of the new features that I think is absolutely fabulous is the ability to change the patterend paper to be any of out 60 colors.  I changed the plaid paper to Olive Green on the second layout to give a bit of diversity.  On this layout I also used the Auto Title tool to slap down the line of stickease to spell "family fun".  You can space the title letters as close or as far away from eachother as you want, you can change the size of each letter and with the Auto tool you can line everything up perfectly.  Having lots of fun with that one!  I also used the resizing feature to change the size of the stickease trees. 

I recently saw a layout where another consultant made a different tree (from the Hooligan paper pack) into a HUGE tree that took up half the page.  I am definitely going to play with the resizing feature a bit more and think more outside the box on how BIG I can make certain stickease!

Yesterday I had an absolute blast at the Seattle Close to my Heart Leadershare event hosted by an Executive Director (not my chain but they opened it up to other local consultants).  I had the honor of meeting my 4th upline, Karen Morris, who is just such a nice lady!  We also had three VP's from the company come and give talks about the upcoming Idea Book changes (going to two per year), Studio J and also upcoming corporate events.  I have some artwork from the event that I'll be sharing soon.  I didn't finish all the stamping yet so I'll share it as soon as I've completed it.  It was an exhausting but FUN day full of learning.  I carpooled with another local consultant (Hi Carrie) and really enjoyed getting to know her a bit more as well as meeting some other local girls. 

I have to say that the best part of having this business for the past couple of years is all the wonderful women I've met through doing this - not only the other consultants on the bulletin boards and locally but also all my wonderful friends and customers!  Its been such an enriching experience for me and I also want to thank all you cyber friends who stop by - your visits and comments have meant so much to me and really keep me charged up!

Thursday, November 4, 2010

CTMH Studio J Layout using CTMH You Rock papers and Members Only Layout

This is one of the layouts I started on October 30th because I needed to place an order by October 31st to get that lovely free shipping for the month on my Studio J membership.  Oh. My. Gosh.  I seriously love Studio J.  In just a couple of hours over two nights (I sent my order in at 10PM on October 31st after we went trick-or-treating) I had completed 6 new layouts and made copies of 7 more from last month for my mother-in-law.   While I adore the artistry of creating layouts from scratch, the fact that I don't have to print out my photos in advance (my personal weakness), can fit it into my schedule at whim and best of all - AM ACTUALLY GETTING IT DONE makes this product perfect for my busy life!  I've even gone back to 2008 and scrapped a couple of my older photos - YAY! 

Spencer is getting to be such a handsome young man!  I still find it amazing that he is taller than me and now has size 11 feet.  The one thing that hasn't changed is that million dollar smile - he's always made my heart melt with that gorgeous happy grin of his! 

I really loved working with the Stickease on this layout - I added the "awesome" tag to his shirt and love the arrows pointing in at him.  I also had lots of fun with adding brads and played around with the Auto Title feature much more this month (so glad I did because its a great tool!).

If you haven't played around with Studio J yet you can check it out on my website at Paige.MyCTMH.com.  You do need to create a free sign-in account in order to play BUT you don't get charged a penny until you sign up for membership or go to print out a layout.  I think its awesome that they let people check it out BEFORE they buy.  If you feel behind on your family scrapbooks, need to do a specific project or just enjoy the low-cost/low-mess of digital scrapping then this is something you'll enjoy playing around with.  As always, if you have any questions I'm happy to help - just leave a comment on this post or contact me at my e-mail paige(at)myctmh.com.
Related Posts with Thumbnails

Blog Archive

Copywrite - or sharing the love!

Thank you for visiting me here on my blog today! I hope you have been inspired by my postings to create something lovely for yourself! It does take me a whole lot of time to create the artwork, tutorials and posts for this blog so if you would like to borrow my wording or artwork then I respectfully ask that you e-mail me for permission, credit me and/or link back to my blog. Thanks for your understanding and respect!

Paige