Friday, December 28, 2012

Cutie Purse with Artiste and Clementine


The different bags, boxes and treat holders (along with the hundreds of other images and coordinating stamps) make Artiste a winner in my book.  I love this sweet little purse that even has a separate pocket for the front you can cut - too adorable!

I used a couple of the Durables metal self-adhesive studs to make the front look even more like a purse and put a bit of Liquid Glass on the center flower medallion to cowgirl glam this up a bit!

Hope you had a craft-tastic day!

Paige

Thursday, December 27, 2012

Clementine Thanks Card

Love this Artiste cut card!  Great for a quick Thank you card.  I cut my card in black CS and then added a panel to the back and some decorative paper to the front.


Thanks for stopping by today and stay crafty my friends!

Paige

Tuesday, December 25, 2012

Merry Christmas! Plus a little Artiste Tree Treat Box


Wishing you all a very Merry Christmas!

 Enjoy the peace and good will of the season, the blessing of family and the joy of giving and receiving from those we love. 


I hope you all had fun opening your presents today!


My Cricut is a happy little bug today because I received a bunch of new products to play with for Christmas!  Fresh mats, a couple of cool cartridges I've had my eye on and the consultant preview copy of the new Idea Book that goes live on February 1st!  

Merry Christmas to all and to all a crafty night!

Paige - Stampologist

Friday, December 21, 2012

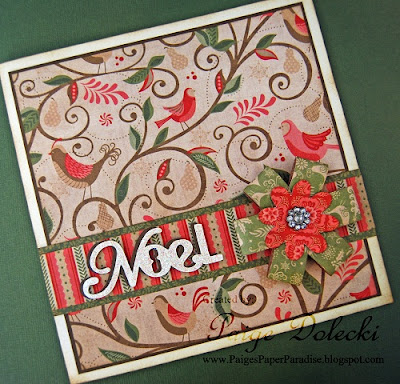
Noel Christmas Card with Cricut Artiste and CTMH Pear and Partridge

This card is pretty much all Cricut Artiste - the Noel and the fun bow were all cut with the cartridge and I just added a bit of Glitz and some bling.  Gotta love how easy the Cricut makes crafting!


What went into this card:


Are you getting excited for Christmas?  I can't believe we are just a few days away!  The kids are all on break now and I've still got all my wrapping to do but at least I'm finally done with my shopping.  My husband and I have to take out two of the kiddos separately so they can shop for their siblings.  My youngest and arguably the best planner of the bunch, has completed his shopping but the two teens still need to hit the stores for their sibling presents.  I have a couple of ideas for good low-cost gifts they can give to each other so hopefully it won't take us long to finish up.

How about you?  Are you all done with shopping, wrapping and cards?  Are you like my MIL who gets it all done by the day after Thanksgiving (hers is ALWAYS my first card of the year) or are you like me and get things done in the nick of time?

Friday, November 30, 2012

Huge Clearance Sale start Friday 11/30 at 11PM PT


Just in time for your holiday shopping!  Close to my Heart just gave me a heads up that starting tonight 11/30 at 11PM Pacific Time there will be a huge "While Supplies Last" Clearance sale on our websites!

To get in on the goodies visit my site at www.Paige.CTMH.com and join the "December Holiday Sale" online party in the right lower corner.  This will take you to the shopping page and all the way at the bottom of the left hand column there is a "While Supplies Last" link.  Click that and have some fun!

When you spend $50 or more you'll get a FREE Bonding Memories Glue Pen (love these for small Cricut cutouts) added to your order!  Break up your order into $50 increments and use our $4.95 USPS shipping option and you'll offset most of your shipping costs!


What is going to be on sale?  A wide variety of paper and coordinating accessories, all with a substantial markdown!  You will also find that most of the items that are currently available will see a further markdown!

To sweeten the deal even more, from December 1-31, all orders placed on my website which reach or exceed $50 will also include the FREE Bonding Memories Glue Pen ($4.50 value)! 

SHOP EARLY because things sell out FAST!  It always seems like the paper and compliments go the fastest so you know where I'll be at 11PM tonight! 

Thursday, November 15, 2012

Home Decor with Close to my Heart

Close to my Heart corporate office just shared this awesome article with me and I had to share with YOU because how fabulous are these projects?  I've done a display tray and today I'm getting started on my advent calendar for Christmas!  Love our new decor items!

Paige - www.Stampologist.com

More out of Home Décor

There are so many creative ways to use hand-crafted 3-D items. Use our great products to create home décor that will bring a fun and unique accent in your home. It’s easy to use Close To My Heart products you already know and love—with a different twist!

This festive thankful countdown uses the My Creations® cubby to celebrate Thanksgiving. Fill the Cricut®-cut boxes with reminders of things you are thankful for, and share the grateful fun with your family. Use it to countdown to your favorite holiday, like Thanksgiving, or use different embellishments and countdown to a loved one’s birthday to show them how much you love them.

This adorable star was made from Collection Two of the Hostess Collections, available through Hostess Rewards in the Autumn Winter 2012 Idea Book. Show your hostesses this spunky star so they have an idea of what they can create from this particular Hostess Collection. While the Dakota paper packet, Casual Expressions stamp set, and Dakota Complements Foil Images have a country feel, you and your customers can use all of these same materials to make a welcoming star for your front door.

Everyday household items can also be combined with Close To My Heart products to create dazzling home décor. Use the Flirty paper packet and your Cricut® machine, along with everyday household items such as a flower pot and Styrofoam ball, to create a papercrafted tree. Or add a few Dimensional Elements to the autumn colors of the Flirty papers to create a desk calendar using two My Creations blocks. You can even use cute Cricut®-cut flowers and leaves to make a festive banner!

For displaying precious memories, the display tray is a perfect fit! Display photos, stamped sentiments, Dimensional Elements, and other embellishments for a prized layout that you can proudly hang anywhere in your home. The display tray is easy to personalize, too; cover up several windows with cardstock for larger photos!

Sunday, November 4, 2012

Re-branding in process...welcome www.Stampologist.com

Hi my crafty friends!

You may have noticed I've been a little out of commission lately - well, there are good reasons behind it!  About two weeks ago I had a leg injury while doing martial arts.  I managed to tear my calf muscle which put me out of martial arts commission for about 8 weeks.  Well, you know me and 8 weeks without doing martial arts is going to be an absolute killer for me.  So what to do?

Well, about the same time that happened I found out about a class that focuses on doing crafting online business.  I signed up and decided that since I'm going to be out of martial arts for a while I should re-work my online presence and learn some new practices while I'm laid up.

What does this all mean?  I'm starting to work on re-branding my site!  The first part you'll see is a new domain name for my blog but you don't have to worry about changing bookmarks or links.  Everything will work the same as before but my new domain name will be www.Stampologist.com.  Within a couple of days you'll probably see your RSS feeds and your e-mail delivery of my posts switch over to that name.

Why Stampologist.com?  Because when I became a Close to my Heart consultant 5 years ago it was because I fell in love with their stamps!  I have a huge and beloved collection of their stamps, have had that name on my business cards for years and really think of myself as primarily a stamper!  Plus, as my husband pointed out its a whole lot less for people to type!

As I learn new things in this class I'll be incorporating them into this site and hope you'll enjoy the enhancements as they come. Most things will be behind the scenes but I'm sure some (like a new name popping up) will catch your eye.

Thanks for being patient with me while I learn new things and heal up.  I promise to have artwork back this week as well as I'm finally able to get up and down stairs easily and visit my craft room more often!

Hugs,

Paige - Stampologist


Friday, October 19, 2012

Tutorial on Cricut Craft Room with Art Philosophy and Artiste Cartridges


If you love your Cricut® machine, then you are going to adore all of the fabulous things you can do with Close To My Heart Cricut®cartridges in the Cricut® Craft Room. Create layers, cut negative space in the shape of your choice, make borders, and link elements together for a connected look. It’s easy! We’ll show you how.
Here is how to get started with Cricut® Craft Room:
  1. Create a FREE account in a few easy steps.
  2. Download and run the application for PC or MAC, depending on the type of computer you use.
  3. Connect your Cricut® machine to your computer using a Type B USB cable. (Note: For more info on this type of cable, see your Cricut® user’s guide or your local electronics store.) Once you have connected your computer to your Cricut® machine, the “Load Mat” button is the only button you will ever need to push on your machine in the entire process. Cricut® Craft Room will do everything else for you.
  4. Once inside the application, choose the type of Cricut® machine you own.
  5. Insert your Close To My Heart Art Philosophy or Artiste cartridge into your Cricut® machine.
  6. In the lower left portion of the application there is a tab that is labeled “Images/Cartridges.” Select “All Cartridges” from the dropdown menu. (Note: You must choose a cartridge that you own. You can also purchase individual images from the Cricut®store.)
  7. Scroll to find the Close To My Heart Art Philosophy or Close To My Heart Artiste cartridges you own.
  8. The virtual mat in Cricut® Craft Room is just like the mat you’ll load into your machine. And, it is oriented the same way that you will load your mat into the machine, with the arrow at the top.
  9. To drag an image to the mat, simply click on the image in the image selection tool box and move it to the mat.
  10. Once the image is on the virtual mat, you can adjust the placement by clicking on the image and moving it to any location on the mat.
  11. Now that you know the basics, you can start creating and exploring the possibilities!

Follow these steps to create the negative space on a card base, like you see on this Cheer Up card, featuring images from the Art Philosophy cartridge:
  1. Select the “Card” tab in the Art Philosophy images. Find the card base you prefer and drag it onto the mat. (We used Square 1 for the Cheer Up card.) The image will be cut in the exact direction and location that you place it on the virtual mat. At the top of the screen, or at the left under the “Shape Properties” tab, you’ll see size boxes. Enter the width and height for your shape. This is the size it will be cut on the machine, regardless of what size your machine indicates on the flip screen.

  1. Choose an image to cut out of your card front. We have chosen a butterfly by going to the Basics tab, clicking the “Show Shift/Lock Images” at the bottom, and then selecting the butterfly. Drag the image to the right side of the card base, position it, and alter the size, as desired. Once the image is in place, you will see a cut-out image in its place. This Weld feature is automatically on unless you disable it, and allows you to see how the card base will look with your images cut out.

  1. Select another image, drag it to the card base, and position it how you’d like it. Continue adding images to the card base, if desired.

  1. To cut your finished artwork, load the mat into your Cricut®machine and insert the corresponding cartridge. Next, press the green Cut button at the top of the computer screen and follow the prompts. The machine will cut the shapes as you have prepared them in Craft Room. If more than one cartridge shape has been added to the project, the machine and screen will prompt you with instructions.

Here are so more artwork examples that have been made using Cricut® Craft Room software. Follow the instructions below to learn some more fun tricks we used in creating this artwork.

Birthday Greetings card


Here’s how to create the bracket frame as shown in this Birthday Greetings card:
  1. Drag a card base from Art Philosophy cartridge and size it to be 9" wide and 4½" high.
  2. Add a 1½" bracket frame (from the Basic tab) to the center of the right side of the card. So far, all of the shapes have been placed in Layer 1. You can add additional layers using the Layer feature located toward the top of the screen, directly above the mat. Each Layer will be cut from a separate sheet of paper and is indicated by a different color on the screen. Using the Layer feature allows you to fully design your Cricut® shapes before cutting any pieces.
  3. Add a second Layer by clicking the plus sign. Click and hold the Layer 2 tab and drag the tab to the left so it is first in the row. This allows you to see the second Layer on top of the first so you can visualize your finished project. Drag a 3" bracket frame to the card base and position it over the 1½" frame. Then, still using Layer 2, add a 1½" bracket frame in the center of the 3" frame.
  4. Maneuver the Layer 2 frames so that they perfectly line up with the Layer 1 frame. Use your keyboard arrows for exactness.
  5. Cut the pieces following the prompts on the computer screen and Cricut® machine. Layer 2 will be cut first, so be sure to load that paper first. Then load a new sheet of paper for the Layer 1 pieces.
  6. Embellish the card as desired.

All Boy page


Want to create a border that spans the entire length of your 12" page? It’s easy!
  1. In Craft Room, change the mat size to 12" x 24" under Machine & Mat tab on the left of the screen.
  2. Drag your selected border to the mat and rotate it so it is vertical.
  3. Change the height of the border to 12". It will automatically change the width proportionally unless you click the aspect ratio button between the width and height measurements.
  4. Whether you have a 12" × 24" mat or a 12" × 12" mat, you can use this function with a 12" × 12" piece of paper. Simply place the border as close to the top of the Craft Room mat as possible, but not exactly flush with the top.

  1. Cut the piece following the prompts on the computer screen and Cricut® machine.
To create the title with the letters joined together to form one piece instead of individually cut letters…
  1. Drag your letters to the mat
  2. Overlap portions of each letter to connect them
  3. Use the Weld feature to join the letters together seamlessly.
  4. Cut the piece following the prompts on the computer screen and Cricut® machine.
There are so many possibilities to explore in the Cricut® Craft Room using the versatile Art Philosophy and Artiste cartridges from Close To My Heart! If you have any questions about using Cricut® Craft Room, visit www.cricut.com where a Cricut® employee will be glad to help you. Be sure to get your Art Philosophy and Artiste Cricut®cartridges today in order to create with them in this new and exciting environment!

Wednesday, October 17, 2012

From Paris with Love card with CTMH Artiste and La Belle Vie

I like this card so much that after I'm done using it as a display item for the La Belle Vie paper pack, I think I'll frame it and use it as home decor.  I don't know if its the sparkly Eiffel Tower (isn't that Cricut Artiste cut awesome?) or the Designer Rhinestone Brad but this card is totally me.


Here is a close up of the embellishment cluster.  See that huge Designer Rhinestone brad?  You get 12 total - 6 big like this and 6 small - for $5.95.  They are one of my favorite accessories in our Idea Book because anything you put them on instantly looks fabulous dahling!


What's in this project?  Click the links below to check it out!


Hope you are having a good week!  I had my fair share of issues to deal with yesterday so I'm hoping for a smoother sailing day today.  We are doing a board breaking session in Tae-Kwon-Do today and I'm looking forward to getting some stress out!

Hugs,

Paige

Monday, October 15, 2012

Bonjour Bow Card with CTMH Artiste and La Bellle Vie

The 3-D bows on our new Artiste Cartridge inspired this shabby chic card.  I wanted to incorporate sparkles, bows and lots of distressing with our La Belle Vie paper pack - so much French flair you just have to go a bit over the top!

In this shot you can just see the tiny dots of Stardust Glitz I added to the background paper.  Oh-la-la!

Here's a shot of the lovely 3-dimensional quality to these bows.  Can you believe its just paper?!?

What went into this project:


Merci for stopping by today, Cheri!  Hope you have a grand week!

Paige

Friday, October 12, 2012

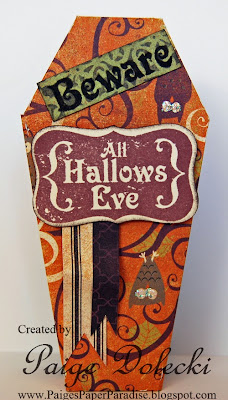
Skeleton and Coffin Party Favor with CTMH Cricut Artiste and Moonlight

Yesterday was a big day in the Dolecki household.  I turned 42 so its now official - I am the answer to life, the universe and everything.  If you've ever read the Hitchhiker's Guide to the Galaxy, you'll understand the Douglas B. Adams reference.  We are big Sci-Fi readers/movie people so I've been waiting to be able to use this one on my family and I get it for a WHOLE YEAR.  Now whenever my kids ask me a question I can just answer me and drive them nuts!  (Har-har-har!  Sarcasm and punning run deep and true in our family so I'm sure to get lots of eye rolls with this one!)

I had an absolutely lovely day filled with some fun shopping (mostly crafty things), lots of birthday wishes, dinner out at a nice restaurant and presents!  I have that wonderful glow of being loved and appreciated that makes birthday's so special.  Thanks to all my friends and my family who made the day wonderful for me!

Now on to some October artwork!

As soon as I saw the coffin cut on the new CTMH Artiste Cricut Cartridge I knew I was going to have to make some of these for my kids to give their friends.  How adorable are these things?  I love adding a bit of Stardust Glitz to the owl eyes on this paper - adds a dash of freaky for the spookish season!
Here is Mr. Skeleton again.  I need to cover him in candy and have some unsuspecting kid find him in the bottom of the box (MWAH-HA-HA-HA! evil laugh inserted here).

Here's to Friday!  My favorite day of the week because my kids are home early from school!  Hope you have a fabulous weekend!

Paige

Tuesday, October 9, 2012

Interactive Bat card with CTMH Artiste and Moonlight Paper

The bat card on our new Artiste Cricut cartridge is just so adorable!  Here I used him as an interactive element on the front of a 4.5" circle card.

Here he is all opened up just waiting to give you a Halloween Hug!


If you'd like to make this project, click on the links below to get these supplies:


Thanks for stopping by today!

Paige

Related Posts with Thumbnails

Blog Archive

Copywrite - or sharing the love!

Thank you for visiting me here on my blog today! I hope you have been inspired by my postings to create something lovely for yourself! It does take me a whole lot of time to create the artwork, tutorials and posts for this blog so if you would like to borrow my wording or artwork then I respectfully ask that you e-mail me for permission, credit me and/or link back to my blog. Thanks for your understanding and respect!

Paige