Thursday, July 29, 2010

Paper Gift Basket Tutorial

As promised, here is a picture tutorial for making the paper gift basket!

1.  Start with 8.5x8.5" piece of Cardstock and a 1.5"x11" strip of matching Cardstock.
2.  Score at 2.5" in on each side of the big piece.


3.  Decorate your handle.  Here I've stamped with the flower edge from Summer Wishes (part of the Splendor Workshop Kit).


4.  Decorate the inside of your box with stamping before you fold along your score lines.  Here I've used stamps from our Hot Diggity set.
5.  Cut along the X lines - only TWO sides are cut to form the box.

6.  For the outside of the box you will need:
A (4) 2.25x2.25"
B (2) 2.25"x 3.25"
C (2) 2.25"x 3" (this one can be shorter because it gets mostly covered up).


7.  Curve the handle by gently running it down the side of your craft table.


8.  Attach the handle about .5" down on the C panel (the one that folds IN).


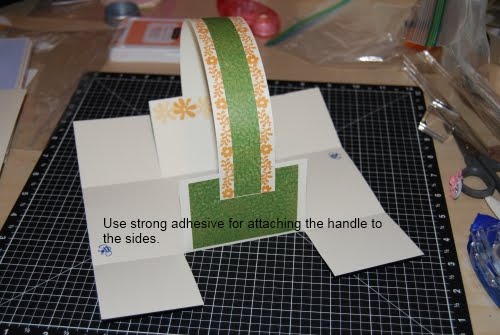
9.  Put adhesive along the cut line on the two sides.  Follow the pencil line shown.


10.  Fold up the two sides so they form a triangle on the side under the handle.


11.  Add an embellishment on the side to cover where they pieces join. Here I've used the big flower on the Summer Wishes set (Spelendor workshop kit) and adhered with a pop dot.

Monday, July 26, 2010

Gift basket using CTMH Splendor Paper and CTMH Summer Wishes and Hot Diggity

Isn't this a sweet basket?  Each side is a little over 2.5" high making it just right to hold a bunch of wrapped candies for a picnic or hostess gift.  This 4th of July I made one with blue paper and stamped the inside with all sorts of 4th of July stamps and wrapped Smarties candies with red paper to look like firecrackers to give to a neighbor who hosted a BBQ.  I forgot to take a picture before giving it away (don't you hate it when you do that?!?).

Anyways - this little beauty was a project at my July Stamp Camp.  A lot of people went for a little bee instead of the spider.  I'm not a spider fan - I tell my kids if it crosses the threshold of the the house then it gets killed, if its outside it can live a full and happy life (my one exception are bees - those I capture and release) - BUT I do like this little guy.  He's such a happy little spider!

Materials Used:
Paper:  Splendor Level 2
Stamps:  Summer Wishes (stamp that comes with the Splendor Kit - love these kits!), Hot Diggity
Inks:  Goldrush, Moonstruck
Other:  Sponge daubers

Sunday, July 25, 2010

Faith, Hope, Love card with CTMH Grace Paper, Everyday Celebrations and Tickled Pink stamp sets


Sorry for the gap in posting artwork.  We've been on a celebration binge for the past couple of weeks - between summer vacation, my middle child turning 12 and my husband finding a job (YAY!!!!) we've been on a happy high note for the past several weeks!  After a year of watching every penny (thank goodness for COBRA and unemployment insurance) one of my customers (hi Tanya!) referred my husband to her husband for a resume hook up - a couple of rounds of interviews later and Mark is now working for a local company!  

I've always said the biggest blessing of my business is making connections with wonderful women I probably wouldn't have met otherwise - this is just one more instance of the kindess and support I've received from all my wonderful friends and customers over the past couple of years.  My family always says I have the nicest friends ever and I just couldn't agree more!  I can't tell you how thrilled I am that we didn't have to move - not only do I hate the process, I just couldn't imagine moving away from all the friends I've made here and the fabulous medical care we get at Children's Hospital.  

Anyways - now that I'm getting back into the swing of being the main parent on duty during the work day - I finally found some time to take pictures of THREE MONTHS worth of Stamp Camp projects!  These babies have just been crying out to be shared with the bigger world so I should be a much better blogger for the next couple of weeks!

Materials Used:
Stamps:  Everyday Celebrations (card kit special last year), I Am (from Tickled Pink special), The Simple Things (retired)
Other:  Sponge Dauber, Microtip Scissors (I only use ours for detailed cutting - they ROCK!)
Related Posts with Thumbnails

Blog Archive

Copywrite - or sharing the love!

Thank you for visiting me here on my blog today! I hope you have been inspired by my postings to create something lovely for yourself! It does take me a whole lot of time to create the artwork, tutorials and posts for this blog so if you would like to borrow my wording or artwork then I respectfully ask that you e-mail me for permission, credit me and/or link back to my blog. Thanks for your understanding and respect!

Paige