Showing posts with label Summer Wishes. Show all posts

Monday, August 2, 2010

Sweet Summer Watermelon Card with CTMH Animal Cookies Creative Basics, Alphabet Solos S, Argyle Backgrounds and Summer Sweetness

Mmmmm...doesn't this card just make you want to bite into a big juicy slice of watermelon???   This is my salute to some of the colors retiring as of September 2010.  Both Summer collections are changing with just Topiary, Dutch Blue, Holiday Red and Sunkiss Yellow staying.  While I loved the old, the new colors are drop-dead gorgeous and will mix so much better with the rest of our color palettes!  I love bright happy colors so I'm looking forward to seeing MUCH more of our new Summer collections being used in our upcoming paper collections!

Tomorrow (Wed. Aug 4th) starts our HUGE $2, $4, $6, for 8 days sale so make sure you visit my website at paige.myctmh.com to get SUPER deals on Level 2 paper packs (just $6!!!), Level 1 kits ($4) and Stickease ($2).  These are some smokin' deals on all the papers released through the end of 2009 which are being retired at the end of this year!

Materials Used:
Paper:  Animal Cookies Creative Basics, Citrus Leaf Cardstock, Watermelon Cardstock, White Daisy Cardstock
Inks:  Watermelon, Clover Meadow, Citrus Leaf
Other:  Watercolor pencils, Summer Posey paper flowers, watermelon organdy ribbon, white daisy ricrac. liquid glass

Pattern is called Name Plate from our Wishes book which you can get for just $21.95 now!  I love our how-to pattern books - they make papercrafting so much easier!

Thursday, July 29, 2010

Paper Gift Basket Tutorial

As promised, here is a picture tutorial for making the paper gift basket!

1.  Start with 8.5x8.5" piece of Cardstock and a 1.5"x11" strip of matching Cardstock.
2.  Score at 2.5" in on each side of the big piece.


3.  Decorate your handle.  Here I've stamped with the flower edge from Summer Wishes (part of the Splendor Workshop Kit).


4.  Decorate the inside of your box with stamping before you fold along your score lines.  Here I've used stamps from our Hot Diggity set.
5.  Cut along the X lines - only TWO sides are cut to form the box.

6.  For the outside of the box you will need:
A (4) 2.25x2.25"
B (2) 2.25"x 3.25"
C (2) 2.25"x 3" (this one can be shorter because it gets mostly covered up).


7.  Curve the handle by gently running it down the side of your craft table.


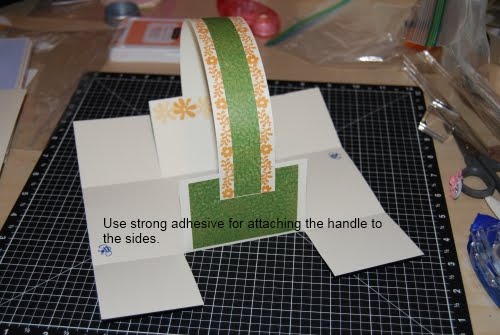
8.  Attach the handle about .5" down on the C panel (the one that folds IN).


9.  Put adhesive along the cut line on the two sides.  Follow the pencil line shown.


10.  Fold up the two sides so they form a triangle on the side under the handle.


11.  Add an embellishment on the side to cover where they pieces join. Here I've used the big flower on the Summer Wishes set (Spelendor workshop kit) and adhered with a pop dot.

Monday, July 26, 2010

Gift basket using CTMH Splendor Paper and CTMH Summer Wishes and Hot Diggity

Isn't this a sweet basket?  Each side is a little over 2.5" high making it just right to hold a bunch of wrapped candies for a picnic or hostess gift.  This 4th of July I made one with blue paper and stamped the inside with all sorts of 4th of July stamps and wrapped Smarties candies with red paper to look like firecrackers to give to a neighbor who hosted a BBQ.  I forgot to take a picture before giving it away (don't you hate it when you do that?!?).

Anyways - this little beauty was a project at my July Stamp Camp.  A lot of people went for a little bee instead of the spider.  I'm not a spider fan - I tell my kids if it crosses the threshold of the the house then it gets killed, if its outside it can live a full and happy life (my one exception are bees - those I capture and release) - BUT I do like this little guy.  He's such a happy little spider!

Materials Used:
Paper:  Splendor Level 2
Stamps:  Summer Wishes (stamp that comes with the Splendor Kit - love these kits!), Hot Diggity
Inks:  Goldrush, Moonstruck
Other:  Sponge daubers

Tuesday, May 18, 2010

Open House Make and Take with CTMH Splendor, A Little Buzz, Leave Your Mark and Glitz

Sorry the first picture is so washed out.  It really didn't look like that to me when I took the photo!  This is the cute card we made with the new Splendor paper pack at my Open House on April 30th.  Isn't that little bug the cutest?  Its from a new set called A Little Buzz that has a bunch of sweet sentiments you can put together to make them say different things along with 4 adorable bugs.    The close ups show our new Glitz Stardust layered on top of our Watercolor pencils.  This stuff is so cool because you get all the glitter without all the MESS!  I love a bit of sparkle but I really dreaded using my Prisma glitter in classes because it just gets all over.  Even in my own craft room one project with glitter would leave me sparkling in spots and get on projects I didn't want to be sparkly.  I'm so glad CTMH came out with this new product to solve that problem AND its cheap - just $2.95 for a 1oz bottle!

Materials Used:
Related Posts with Thumbnails

Blog Archive

Copywrite - or sharing the love!

Thank you for visiting me here on my blog today! I hope you have been inspired by my postings to create something lovely for yourself! It does take me a whole lot of time to create the artwork, tutorials and posts for this blog so if you would like to borrow my wording or artwork then I respectfully ask that you e-mail me for permission, credit me and/or link back to my blog. Thanks for your understanding and respect!

Paige