Showing posts with label Lucy. Show all posts

Tuesday, April 24, 2012

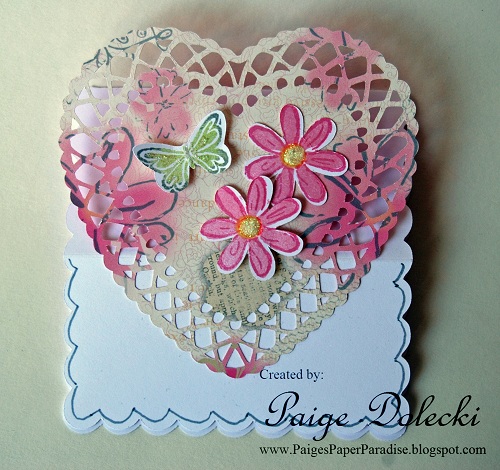
Fancy Fold Heart Card with Lucy and AP cartridge

This card was lifted from a very talented fellow CTMH consultant, Pam Klassen - see her beautiful original HERE.  Pam made her card into a cute Valentine and I changed mine up to be a birthday card.  

The shapes for this one were cut using the AP cartridge and this time I was smart enough to write down on a post-it what size I cut things at - see below for sizes!


Cut Directions for AP Cartridge:
Card Base:  Scalloped Square Card Base at 4.25"
Pink inside:  Scalloped Square at 3.75"
Heart:  at 4.25"
Flowers and Butterfly:  Per directions on Lucy WOTG stamp set

Score the card base at about 2" up from the bottom.  The heart is adhered to the bottom section only, to make sure it fits in a standard sized envelope use a ruler or mat to make sure the top of the heart does not extend beyond 5.5" when adhered to the front.  To make the card stand up you pop dot an image (a flower on this card) to the inside to catch the top flap when folded up.

To make this card, get these supplies:
Paper:  Lucy

That's all folks!  Thanks for stopping by today!

Paige

Monday, April 23, 2012

Get Well Soon card with a funny twist

I've seen a couple of cards with band-aid stamps on them in various cardmaking magazines but I didn't have a stamp like that in my collection.  What to do when you really want the look?  I dug into my medicine cabinet and found a big honking band-aid to add to the front of this card!

I made this for the wife of one of my martial arts buddies who had to have surgery for an injury she received at her workplace.  


How easy to make this one - just frame out a band-aid, add a 1" heart and some letters from the AP cartridge!


If you'd like to make this card, get these supplies:
Paper:  Lucy, Tulip CS, Chocolate CS
Stamps:  Joyful Jars (for sending you sentiment)
Ink:  Chocolate
Other:  Giant band-aid, Liquid Glass, AP Cartridge to cut letters, Martha Stewart 1" heart punch, 5x7" white cardbase

I'm so glad I had the chance to do a photo session today while my boys are wrapped up in movies on the couch.  The doctor said its a flu virus - what a bummer after we all were immunized in October.  It will probably hang around for several more days before they are back to the land of the living.  Thanks for stopping by today!

Paige

Monday, April 16, 2012

Sewing Technique Challenge for Heart2Heart Challenges

I'm "sew" excited for this week's challenge at Heart2Heart Challenges - its a sewing technique challenge!  Create a project that features Close to my Heart products and some kind of sewing - machine, faux stitching, stamped stitching, hand stitching, etc. and post at the Heart2Heart Challenges site!  Remember to say in your post that your project is for our challenge!

One of the very first crafts I learned was hand embroidery so this project really took me back in time.  I don't think I've done an embroidery project in the past 10 years!  I have to admit after doing this I started thinking about a few unfinished pieces I have in my embroidery bag that I should probably finish one of these decades.  

I drew the stems and leaves by hand and used a back stitch to go over the outlines.  I then used a White Daisy marker to go over the inside of the leaf and a layer of Olive marker on top of that to give the leaf more definition.  The centers of the flowers are French Knots done with our black and white Baker's Twine.  It looks like little seeds when its knotted up like that!
A quick tip on doing hand embroidery on your cards, a double layer of paper is easier to work with than a single layer.  I used my piercing tool to make holes for the stitching on the lagoon/black piece and it was a breeze.  The single layer flower shape I had to put a couple of layers of Scotch Tape on the back of the shape to keep the paper from falling apart with so many French Knots.  I didn't stamp a sentiment on this card because I need to build up my stash of all purpose cards - you know the ones you can add any kind of sentiment to and send off at a moment's notice. 

If you'd like to make this project, get these supplies:
Paper:  Stella, Black CS
Other:  Art Philosophy, Baker's Twine Neutral Assortment, Green Collection Embroidery Floss (retired)

Thanks so much for stopping by!  I hope you'll head on over to Heart2Heart Challenges and create a project for this week's sewing technique challenge!

Paige

Monday, March 12, 2012

What's the Buzz? with CTMH Lucy and Bee Happy


This card was inspired by a very talented fellow consultant, Kandi Gallegos-Garcia.  Unfortunatley, I didn't see her original out on her blog or I'd point directly to it.  I used the AP cart to cut the banner and Tiny Typewriter to create the sentiment.  I like creating sentiments with alphabet stamps but those tiny letters are hard to line up so I usually stamp 10-15 sets of specialized sentiments at a time in case I want to make duplicates down the road.


If you'd like to make this project, get these supplies:
Paper:  Lucy, Kraft CS
Ink:  Black


Friday, March 9, 2012

Hello There Baby card with CTMH Lucy, Zoology, Vintage Type and Art Philosophy

I think ever since I saw Dumbo as a little girl I've always associated elephants with babies.  It must be that heart-breakingly lovely "Baby of Mine" song in the movie.  Here I took the cute little elephant from our Zoology set and paired it up with Lucy for a sweet bannered and be-ribboned baby card.


I used my craft knife and cut along the seam of the elephant ear and then put a pop dot behind to accent the dimension.


If you'd like to make this project, get these supplies:
Paper:  Lucy
Stamps:  Zoology (elephant and sentiment), Vintage Type (alphabet on the banner)
Other:  Art Philosophy Cartridge for shapes, Color Ready Seam Binding, Licorice Opaques, Paradise Paper Flowers, Hot Pink Ultra Fine Sharpie (for coloring the letters in Baby)

Related Posts with Thumbnails

Blog Archive

Copywrite - or sharing the love!

Thank you for visiting me here on my blog today! I hope you have been inspired by my postings to create something lovely for yourself! It does take me a whole lot of time to create the artwork, tutorials and posts for this blog so if you would like to borrow my wording or artwork then I respectfully ask that you e-mail me for permission, credit me and/or link back to my blog. Thanks for your understanding and respect!

Paige