Phew, what a busy couple of weeks I've had! The Stamp Camp was an absolute blast - a lot of prep work but oh, my goodness 10 ladies and I had soooo much fun! As with any first there were a few hiccups but they'll be smoothed over for the next one in May (Tuesday, 18th May at 10AM and Friday, 21 May at 7PM) if you are interested in coming! I'll definitely be adding this class in to my monthly schedule!
As soon as Stamp Camp was over I delved into all my new goodies to get ready for my Open House this Friday, 30th April! I've been oohing and aahing over all the new stuff and having a great time putting together the samples of the new workshops! I love, love, love the stamps they created for this round of workshops - CTMH really outdid themselves with terrific versatile design. This morning I finished a sweet little treat for all the lucky ladies coming to the party and tonight I finished the design for the make-and-take we'll be doing. I think you girls are going to LOVE what I've come up with - it made my 14 year old daughter squeal with the cuteness factor. Yes, I pass all my creations by my kids and hubby to guage cuteness quotient.
So, once I've recovered from the Open House (probably Monday - LOL) I'll begin posting all sorts of fun, fresh and new stuff for you all to see. In the mean time here is a freaking hilarious video I found by Anita Renfro that anyone can enjoy! Seeing as how I'm turning 40 (good golly, can it be????) this October I found this video particularly hilarious tonight!
Wednesday, April 28, 2010
Wednesday, April 7, 2010
You asked for it, you GOT it! Stamp Camp coming in April!
Over the past couple of years I've had several requests for a Stamp Camp ladies night - both at my house and at other homes. Well, it took me some time to figure out the logistics and gather the supplies I'd need (lots and lots of blocks not to mention inks, tools, paper and stamps!) but its FINALLY HERE! Starting this month on Friday, 16th April I'll be hosting my first big STAMP CAMP!
In the past I've showcased specific projects that we would do during my two hour creative classes. We would sit down and pass each stamp and ink along until our whole circle was done with one project. I know we all had fun together but its sometimes hard for a quick person to wait on someone who takes a bit longer to finish up a project. The one thing I've learned is that my lovely ladies ALL have their own style and pace when it comes to scrapping and crafting.
So, to keep things fresh and fun here is how my new Stamp Camps will operate:
- I'll have a large selection of mostly cards and some projects (things like tags, bag toppers, mini boxes, etc.) for people to choose from - at least one project per person attending. They won't all be shown prior to the Stamp Camp so there are sure to be surprises every time!
- Each project will be in a stand alone box with everything you need to complete that particular project. When you are done with one project simply grab another box!
- YOU can pick and choose which projects you'd like to do. If you LOVE one particular project there will even be extras cut for you to assemble! If I run out on a project you can request that one to be brought back for the next session!
- The Stamp Camp will run on a STRICT time line - because you girls would stay all night crafting if I let you - LOL! We will start at 7PM on the dot and end at 9PM on the dot.
- Pricing is $15 per person for all-you-can-make during 7-9PM. If you're in the crafting groove and want to finish additional projects, you can purchase and extra hour 9PM-10PM for an addtional $5. If you bring a friend who is new to me, you'll get a 50% discount on your Stamp Camp!
- You will bring your own adhesives (Tombow, Glue Dots, pop dots) but everything else is pre-cut, ready to stamp and assemble!
After doing a bit of a trial run on this during the last creative class, I think this new system is going to be a huge hit! I'll be creating things with various styles, colors and techniques to have literally something for everyone. For this upcoming session alone I already have Mother's Day, baby boy and baby girl cards, a teen card and a get well card - and I'm not done yet! I've even updated and brought back that huge hit - the flower pot card! I really think you girls are going to love this and I'm so excited to share it with you!
There will be limited seating so be sure to send me an e-mail to paigedolecki@yahoo.com or give me a call to reserve your spot at the table today!
In the past I've showcased specific projects that we would do during my two hour creative classes. We would sit down and pass each stamp and ink along until our whole circle was done with one project. I know we all had fun together but its sometimes hard for a quick person to wait on someone who takes a bit longer to finish up a project. The one thing I've learned is that my lovely ladies ALL have their own style and pace when it comes to scrapping and crafting.
So, to keep things fresh and fun here is how my new Stamp Camps will operate:
- I'll have a large selection of mostly cards and some projects (things like tags, bag toppers, mini boxes, etc.) for people to choose from - at least one project per person attending. They won't all be shown prior to the Stamp Camp so there are sure to be surprises every time!
- Each project will be in a stand alone box with everything you need to complete that particular project. When you are done with one project simply grab another box!
- YOU can pick and choose which projects you'd like to do. If you LOVE one particular project there will even be extras cut for you to assemble! If I run out on a project you can request that one to be brought back for the next session!
- The Stamp Camp will run on a STRICT time line - because you girls would stay all night crafting if I let you - LOL! We will start at 7PM on the dot and end at 9PM on the dot.
- Pricing is $15 per person for all-you-can-make during 7-9PM. If you're in the crafting groove and want to finish additional projects, you can purchase and extra hour 9PM-10PM for an addtional $5. If you bring a friend who is new to me, you'll get a 50% discount on your Stamp Camp!
- You will bring your own adhesives (Tombow, Glue Dots, pop dots) but everything else is pre-cut, ready to stamp and assemble!
After doing a bit of a trial run on this during the last creative class, I think this new system is going to be a huge hit! I'll be creating things with various styles, colors and techniques to have literally something for everyone. For this upcoming session alone I already have Mother's Day, baby boy and baby girl cards, a teen card and a get well card - and I'm not done yet! I've even updated and brought back that huge hit - the flower pot card! I really think you girls are going to love this and I'm so excited to share it with you!
There will be limited seating so be sure to send me an e-mail to paigedolecki@yahoo.com or give me a call to reserve your spot at the table today!

Wednesday, March 31, 2010
My favorite time of the year...
Tonight is a big night for me. I've already told my husband that he is getting up with the kids tomorrow morning to get them off to school because Mommy is going to be staying up late glued to her computer checking out the consultant preview of the new Summer 2010 Close to my Heart Idea Book! One of the things I love about CTMH is that we get a whole new set of additional products every 4 months which keeps things fresh and fun! New workshop kits (my favorite), new stamp sets, new paper packs and stickease, new tools and new accessories! I just hope my business budget can take it!
The good news for you? I'll be posting sneak peeks of products in about two weeks! I won't give away the whole shebang because I know you love surprises just as much as I do but a few projects made with some of our scrumptious new products will whet your whistle for whats to come! I'm already getting excited for my next open house - do I hear Stamp Bucks Auction in the air?!?
The good news for you? I'll be posting sneak peeks of products in about two weeks! I won't give away the whole shebang because I know you love surprises just as much as I do but a few projects made with some of our scrumptious new products will whet your whistle for whats to come! I'm already getting excited for my next open house - do I hear Stamp Bucks Auction in the air?!?
Wednesday, March 24, 2010
Groovy Bright Teen Card

This is probably one of my favorite color combinations - Citrus Leaf, Ocean, Orange and Black. If I'd wanted something a bit more girly I would add in some pink but my daughter is more of a blues and greens girl than pink. Just this morning my youngest (8 yrs old) was telling me how when he grows up and gets a girlfriend he'll want her to be like this sister - pretty but not girly, smart and focused on school, fun and must like video games. All I can say is that whoever my boys decide to marry, that girl will have some big-sister shoes she'll have to fill. I just love how much my boys love their sister!
The center of the flowers have a little "ball" of orange sassy strands rolled up and adhered with liquid glass. I've also given some liquid glass shine to the word "groovy" and the little blue flowers. Liquid Glass is just one of those must-have products. I even use it to fix toys for my kids!
Materials Used:
Paper: Black CS, White Daisy CS
Stamps: Groovy (retired but I love this one!)
Other: Liquid Glass, Sassy Strands (retired)
Monday, March 22, 2010
New Journal with CTMH Veranda and A Tweet

I just love these new journals from CTMH! They have a clear protective cover that you slip your artwork behind instead of adhering to a cardboard cover. Not only does this protect what you've made but it also makes it easy to change out your cover if you'd like. Its sized at 5x7" so it is perfect for a photo too! What a great gift item these will make! Wouldn't it be cute on your desk with a photo of the kids? How about making it into an address book? A running To Do list? That's how mine will be used!
This design was inspired by another CTMH consultant.
Materials Used:
Paper: Veranda Level 2
Stamps: A Tweet
Inks: Cocoa, Creme Brulee
Other: Bitty Sparkles, Chocolate Mini Medley (retired but the Copper Mini Medley would work great too!)
Sunday, March 21, 2010
Cheerful Masculine Window Birthday Card with CTMH Everyday Celebrations and the Cuttlebug
Here's a cheerful masculine birthday card I made the other day. I attached the Moonstruck cardstock to the front of my card base and then punched through both layers to make a window. Boy was that hard getting the punch to go through two layers - next time I'll use a Nestie instead! Then I sent the front through the Cuttlebug with my Birthday folder....

 Materials Used:
Papers: Moonstruck Cardstock, White Daisy Cardstock
Stamps: Everday Celebrations Stamp (from a promotional kit we had last September)
Inks: Clover Meadow, Moonstruck, Chocolate, Sunflower Marker
Other: Liquid Glass, Orange Ribbon (Michael's Crafts), Provocraft Birthday Folder

...centered the cake stamp through the window and stamped. Next I opened up the card and added the sentiments. To finish it off I added a bit of liquid glass to the candle flames and the cake icing and (just because I am very fond of orange) added a ribbon to the front!

Papers: Moonstruck Cardstock, White Daisy Cardstock
Stamps: Everday Celebrations Stamp (from a promotional kit we had last September)
Inks: Clover Meadow, Moonstruck, Chocolate, Sunflower Marker
Other: Liquid Glass, Orange Ribbon (Michael's Crafts), Provocraft Birthday Folder
Thursday, March 18, 2010
Blooming Garden Action Card with CTMH Damask Tiles, Smiles and Butterfly Wings
This card has a hidden surprise behind the front panel....

a flower garden blooming!

The flowers are attached to a side bar which you pull up and down with the metal tag on the side. When you slide the bar up the flowers "bloom" from the top of the card. Isn't that super cute???
Materials Used:
Stamps: Damask Tiles, Smiles, Butterfly Wings (former Stamp of the Month special)
Other: Tiny Tabs
Tuesday, March 16, 2010
Shaped Piece of Cake Girl Birthday Card with CTMH Intrinsic Backgrounds
This is the "sister" card to the chocolate frosted cake card I posted yesterday. This one uses Baby Pink cardstock that is overstamped with our Intrinsic Background trellis pattern and the chocolate cake is using the floral pattern. After I assembled the card I went over the trellis pattern with liquid glass (just following the lines without too much precision) to give the cake a bit of glam.

A better shot of the liquid glass shine.

Paper: Baby Pink CS, White Daisy CS
Stamps: Instrinsic Backgrounds
Ink: Hollyhock, Chocolate
Other: White Daisy Mini Medley (flower brads), White Daisy Ricrac, Just Blooms Paper Flowers
Monday, March 15, 2010
Shaped Slice of Cake Card with CTMH Grace Paper Pack


I just love how our Grace paper pack looks like chocolate frosting and the reverse of the paper looks like yellow cake! Doesn't this look yummy enough to eat? Mmmmm....I'm thinking my kids might be getting cupcakes tomorrow for a treat!
Materials Used:
Paper: Grace Level 2
Stamps: Tiny Typewriter for the sentiment
Ink: Twighlight
Other: Colonial White Ricrac, Pearls (former Connection Club reward)
Sunday, March 14, 2010
Veranda Family layout with CTMH Veranda Basic Kit and Friendship Alphabet

I just love the colors in our Veranda paper pack as they have such a vintage feel. This layout features the stamp set that comes with the Veranda Basic Workshop kit. I've used the set to make the paper flowers on this layout - some are stamped directly on the layout and some are trimmed out and then layered. Don't you just love the little hummingbirds?
Materials Used:
Friday, March 12, 2010
Thinking of You with Color Me Monday Challenge and CTMH Veranda Kit stamp, Gracious Greetings


I'm really enjoying the Color Me Monday challenges found on Jeanette Lynton's website! This unusual combination made for a wonderful spring colored card! The first photo doesn't show much of the Pearl paint I added to the edges of the card for some vintage softness. This photo shows the shimmer much better:

I've used a tiny bit of Creme Brulee cardstock as "thread" inside the buttons.
Materials Used:
Paper: Key Lime textured CS, Heavenly Blue textured CS, Creme Brulee CS, Holiday Creative Basics retired (Ponderosa Pine roses - I made these earlier as a test and decided to use them even though they weren't olive), Caboodle Level 2 (Heavenly Blue roses)
Stamps: Veranda's Thinking of You from the Basic Kit, Gracious Greeting
Ink: Olive
Other: Pearl Paint, Spring Craft Buttons, Martha Stewart Butterfly punch, Martha Stewart Corner punch
Thursday, March 11, 2010
Baby Girl Card with CTMH Boutique Borders, Sweet Baby and Building Block Alphabet

Here is the "sister" card to yesterday's baby boy card post.
Materials Used:
Other: Creme Brulee Ribbon
Wednesday, March 10, 2010
Baby Boy Card with CTMH Boutique Borders, Sweet Baby, Building Blocks Alphabet

This very sweet baby boy card is done in Crystal Blue, Sweet Leaf and Chocolate - a wonderful palette for boy items. I love how the Sweet Leaf green really softens the color scheme.
Materials Used:
Other: Basic Brads
Friday, March 5, 2010
Free Standing Pop Up Card for St. Patrick's Day with CTMH Lucky You and So Lucky
I've seen this free standing pop up card style floating around and thought it would be fun to give it a try. I used Jeanette Lynton's Green With Envy color palette from her Color Me Monday post this past week to create a fun St. Patrick's Day card. (See her artwork here.)


 Materials Used:
Paper: Emporium Level 2 (Sweet Leaf pattern), Holiday Creative Basics (Ponderosa Pine - backside of one paper - retired), Sweet Leaf Cardstock, Topiary Cardstock
Stamps: So Lucky, Lucky You (retired), Connections (pattern on circle at top)
Inks: Ponderosa Pine
Other: Watercolor Pencils, Sweet Leaf ribbon, Ponderosa Pine Brads (retired)
Here is the card folded up for mailing...


and here it is when you pull the tag to pop it out into a free standing card...

Close up of my little dancing leprechaun - isn't he an adorable fellow?

Close up of the stand portion of the card. I've taken the clover image and done some random stamping on the Topiary cardstock to give the stand a bit of pizazz.

Paper: Emporium Level 2 (Sweet Leaf pattern), Holiday Creative Basics (Ponderosa Pine - backside of one paper - retired), Sweet Leaf Cardstock, Topiary Cardstock
Stamps: So Lucky, Lucky You (retired), Connections (pattern on circle at top)
Inks: Ponderosa Pine
Other: Watercolor Pencils, Sweet Leaf ribbon, Ponderosa Pine Brads (retired)
Tuesday, March 2, 2010
Word Blocking Technique Picture Tutorial using CTMH Thank You
After making my Anniversary card yesterday I thought it might be good to post a quick picture tutorial on the Word Blocking Technique in case its something you haven't come across before.

Word Blocking Technique Picture Tutorial:
1. Select block that is large enough to hold several acrylix stamps. I like a square block as its easy to rotate.
2. Place stamps (words and/or images) closely together varying the directions until the entire block is covered. Here I show a 4x4 block (I used that size because I wanted the big THANKS in the center)

3. Stamp image in the center of the card to start (you can also start in one corner).

4. Fill in the remaining areas by rotating the block 1/4 turn each time you stamp.

5. Remember to stamp off the page with partial images to completely fill the front of the card.
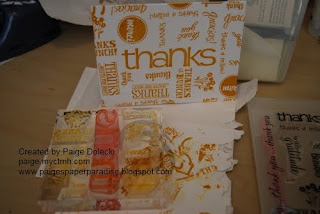 6. You can either use the card as is for a very quick and simple card or you can use it as a base for further embellishment.

Word Blocking Technique Picture Tutorial:
1. Select block that is large enough to hold several acrylix stamps. I like a square block as its easy to rotate.
2. Place stamps (words and/or images) closely together varying the directions until the entire block is covered. Here I show a 4x4 block (I used that size because I wanted the big THANKS in the center)

3. Stamp image in the center of the card to start (you can also start in one corner).

4. Fill in the remaining areas by rotating the block 1/4 turn each time you stamp.
5. Remember to stamp off the page with partial images to completely fill the front of the card.

Materials Used:
Paper: White Daisy, Dazzling Diecuts in Honey and Outdoor Denim (former promotion)
Inks: Honey, Outdoor Denim
Other: Liquid Glass
Subscribe to:
Posts (Atom)


 Posts
Posts


.jpg)
.jpg)