Here is a video done by Close to my Heart Corporate giving you some ideas on how to add shimmer to your projects!
If you receive this via e-mail and you see a black box below then click out to my blog to see the actual video.
Hope your day is shiny!
Paige
Thursday, March 21, 2013
And the winner of the Green Goodies blog candy is...
The winner of last week's Green Goodies Blog Candy is....
Comment #1 - Kigz (aka Amie Kiger).
Amie - please send your mailing address to paigedolecki@yahoo.com and I'll get your prize out to you!
Check out the adorable grin on my youngest kiddo's face as he gets to pick the blog candy winner. My kids always like pulling prize names!

I'm off to work on my Design Team project, package up some baked goods for my two oldest who are going on a weekend trip with Key Club, help them pack, finish up laundry, get my youngest from school, take a physical therapy walk for my knee and about a thousand other things that need to be done today!
Stay crafty my friends!
Paige
Comment #1 - Kigz (aka Amie Kiger).
Amie - please send your mailing address to paigedolecki@yahoo.com and I'll get your prize out to you!
Check out the adorable grin on my youngest kiddo's face as he gets to pick the blog candy winner. My kids always like pulling prize names!

I'm off to work on my Design Team project, package up some baked goods for my two oldest who are going on a weekend trip with Key Club, help them pack, finish up laundry, get my youngest from school, take a physical therapy walk for my knee and about a thousand other things that need to be done today!
Stay crafty my friends!
Paige

Thursday, March 14, 2013
Technology improves *most* things - funny video
Living with someone who is very tech savvy and recently switched me over to an IPhone and IPad (which I adore) this commercial made me laugh!
Monday, March 11, 2013
H2H Challenges - Go Green Lucky 4 Leaf Clover Framed Art plus a Giveaway!
If you've been a reader for a while you know that I love to create seasonal framed art using my scrapping supplies so this week's Go Green challenge at Heart2Heart Challenges seemed the perfect time for me to create a home decor piece in honor of upcoming St. Patrick's Day!


.jpg)


.jpg)
Stay crafty my friends!
Paige

I have a deep set 12x12" frame that I picked up at Michael's on sale a while back that lets me create artwork with up to 2" in depth and still get it behind the glass (I removed the glass before taking the above shot to avoid glare). I use the same frame over and over and simply store the seasonal layouts in my craft room throughout the year in our 3 ring "Work in Progress" binders. Click here to check them out.

I created the clover by cutting out the Cricut Art Philosophy at 5" found on p.50 in the book.
.jpg)
I cut apart the petals, folding them in half and then bending the outer edges up. I used the 5th petal to cut out the stem. I adhered them to a circle of scrap and put a button in the center to cover up the edges.

I like using the font on Art Philosophy that has the dots for glitter or gem placement - it makes it so easy to be uniform! I used Almond Glitz Glitter Gel which looks gold when it dries. The rainbow background was created by cutting 1" strips of cardstock, inking the edges and sending it through my handy paper crimper. Love that thing - it gives so much texture and you aren't limited by length of your piece.

The ruffled ribbon tanked my first attempt at this project (the first one wound up in the trash). I was using wired ribbon that I bought on a huge spool at Costco but I couldn't get it to stay on the edges of the first attempt. I used Tacky Tape and glue but no dice. I started over and this time I outlined where I wanted the ruffles on the bottom black cardstock and STAPLED the ruffled ribbon directly to my black base. It worked perfectly! I stacked some scrap paper under to build up depth and laid the rainbow piece right on top.
Without my first disastrous attempt, this project was actually fairly fast to put together and I won't be shy about using the stapler to affix ruffled ribbon in future home decor pieces!
I hope you'll hop on over to Heart2Heart Challenges this week and join in the fun by creating your own Go Green project. We are open to interpretation on this one - you can do St. Patrick's Day, something green or even green as in recycled or reused for your project! We only ask that you use mostly Close to my Heart products! If you need to replenish your supplies or just want to check out the latest items in the Idea Book, feel free to shop my website at www.Paige.CTMH.com. If you join my March 15th party, I am doing a Mystery Hostess party and giving away the Hostess Rewards if we hit $150! Even if we don't hit $150 I'm still giving away a free D size stamp set from my stash pulled from the order names (I have a big stash so there are lots of sets to choose from)! Winner will be pulled on March 16th just in time for St. Patrick's Day!
March Madness Giveaway Prize!
If you've come here from the Heart2Heart Challenges blog then you know about the March Madness prizes we are doing through the main Heart2Heart blog but the Design Team gets to play along too if they want - and I want! So, in honor of St. Patrick's Day I have a little green bundle of goodies I'm giving away! Comment on this post before Monday, 18th March and you'll be entered to win this bundle of green goodies which includes 5 yards of emerald green Baker's Twine, a Sweet Leaf accessory pack (1 yard ribbon, 4 corduroy brads, 2 metal tags) and a homemade card telling you just how wonderful you are for commenting because I'm so lucky to have YOU visit me! Limited to US posting (sorry!)
.jpg)
What went into my project?
Paper: Black, Ruby, Sunset, Buttercup, Topiary, Crystal Blue, Pacifica, Gypsy Cardstock, Chantilly Level 2
Other: Cricut Art Philosophy Cartridge, Almond and Silver Glitz Glitter Gel, Topiary button (from retired set), Wired Ribbon (Costco at Christmas), Deep set frame from Michael's
Stay crafty my friends!
Paige
Friday, March 8, 2013
Join the March 15th party and win a prize!
Hello my crafty friends!
I am just $75 away from my quarterly sales goal so I thought
I’d do something fun to get me there and reward my customers at the same time! From now until March 15th when you
place an order through the open party on my website (www.Paige.CTMH.com), you’ll be entered to win a
Mystery Hostess prize! If the order hits
$150 or more then the prize will be at least $25 in hostess rewards, if it
doesn’t hit $150 the prize will be a D size stamp set from my collection (I’ll
offer you a selection to choose from). I’ll draw the winner from the order names
on Saturday, 16th March and contact the lucky person to select their
hostess rewards or stamp set.
There are lots of terrific items on the “While Supplies Last”
section of my website including the awesome Scroll Album kit (minus the stamp
set) for just $12.50 and lots of items under $2!
What’s the next workshop? Chantilly Card Workshop on Friday, 22
March from 6:30-10PM!

You can place your order for the Workshop ($29.95) through this order and come play with me from 6:30-10PM so we can put together your kit! I’ve made some alterations to my version of the kit using all the same cuts, inks and papers just adding a bit of flair to get 15 variations of the cards. I’ll show you how easy it is to use your workshop materials to create the variations or make your kit as shown in the instructions. Here are some quick cell phone pictures of my variations - the original design is the front left card on each picture.
.jpg)
.jpg)

Let me know if you have any questions! Happy shopping!
Paige Dolecki - CTMH Consultant and Stampologist
cell: (425) 260-6965
cell: (425) 260-6965
e-mail: paige@stampologist.com
online shopping: www.Paige.CTMH.com
online shopping: www.Paige.CTMH.com
Monday, March 4, 2013
Find out how to win one of our new hinged display trays!
Jeanette Lynton (founder of CTMH) has a new contest on her blog for people to win one of the new hinged display trays! To enter you'll need to visit her blog to enter a comment but you can see the video for ideas on using the display tray here!
Saturday, March 2, 2013
Eclectic Mini Album all cut with Cricut Artiste Cartridge
This mini album is so adorable and the tips for sewing the binding with Baker's Twine are great! Enjoy!
Monday, February 25, 2013
Tie Dye Die-Cut Resist Ghosting Technique - CAS Heart2Heart Challenge
Hello friends!
I started researching some ideas for creating a Clean and Simple (CAS) project for this week's challenge at Heart2Heart Challenges and found this tutorial for a spray misted dyed card. I loved the look so I made it my own by using CTMH products to create my own version!
I blended four colors of ink (Ruby, Gypsy, Crystal Blue and Pear) on to a piece of White Daisy cardstock.


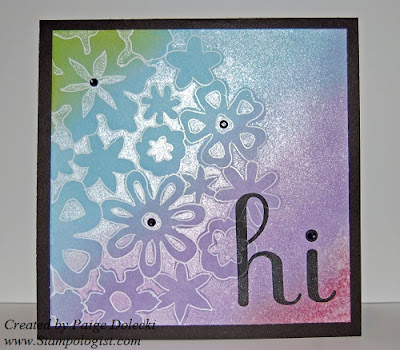
I started researching some ideas for creating a Clean and Simple (CAS) project for this week's challenge at Heart2Heart Challenges and found this tutorial for a spray misted dyed card. I loved the look so I made it my own by using CTMH products to create my own version!
I blended four colors of ink (Ruby, Gypsy, Crystal Blue and Pear) on to a piece of White Daisy cardstock.

I then took a 6" flower lace die cut from the Art Philosophy cartridge and laid it over my inked piece and misted it using water mixed with our Pearl Paint. To pop the color difference a little more I used a white gel pen to doodle outline my flowers and then stamped the sentiment in black pigment ink. A couple of sparkles colored black with a Sharpie marker cap off the look.

I love the shimmer the pearl paint gives the misted areas and the contrast with the die cut resist.

Now hop on over to the Heart2Heart Challenge blog and check out the other CAS creations made by our Design Team. Then grab some of your Close to my Heart products and create a CAS project of your own to share with us! If you need to pick up some more CTMH goodies or if you just want to browse the new Idea Book, visit my website at www.Paige.CTMH.com.
Thanks for stopping by today! Stay crafty by friends!
Paige
Products used in the project:
Other: Sparkles, Pearl Paint, Spray Pen, Cricut Art Philosophy Cartridge, Chocoloate Alphabet Large, Black Sharpie, Uniball White Gel Pen
Thursday, February 21, 2013
Creating fun foldables with your Cricut CTMH cartridges!
Here is another great corporate video showing just a few of the Cricut cuts that you can fold to create dimension. There are so many of this type of image on Artiste and Art Philosophy and its always fun to see how they can be used!
Tuesday, February 19, 2013
Tips for using Cricut Craft Room
I've been playing around with the Cricut Craft Room software lately and I'm really starting to LOVE it! It adds so much versatility to all your images! Here is a video created by CTMH corporate with some great simple ideas for getting started with the CCR. I hope you enjoy it!
Paige
Monday, February 11, 2013
Love is in the Air Challenge at Heart2Heart Challenges with CTMH For Always
Heart2Heart Challenges has the perfect challenge for this week to honor Valentine's Day - its called "Love is in the Air" and yes, I was channeling Barry White as I created this glittery Valentine! I've seen cards with this design on Pinterest and wanted to create it with CTMH goods as I think it pretty much explodes with love. The black Glitter paper and our new For Always paper pack really called out to me for this one!

Close up of the library card pouch cut with Cricut Artiste cartridge and fabulous black Glitter Paper hearts!

Inside detail.

I hope you'll join us over at Heart2Heart Challenges this week and share your "Love is in the Air" themed cards! All you have to do is have some CTMH product on your project in order to qualify for this one so grab your goodies and create some love!
If you are looking to supplement your current CTMH stash or want to see the new goodies in the Idea Book, simply hop on over to my website at www.Paige.CTMH.com!
Stay crafty my loving friends!
Paige
This card is entered in the following challenges:
Wednesday, February 6, 2013
Teacher Appreciation Card with CTMH A Tree and Thoughtful Tidings
I really dig the bright and cheery color combination on this one. Its a mix of Indian Corn Blue, Gypsy, Sweet Leaf and Olive. I embossed the tree and used a waterbrush to color in the patterns. It really helps to pop out the little birds and butterflies that are part of the tree top.


What went into this project?
Paper: Dreamin' (Blue - retired), Gypsy CS, Sweet Leaf CS, Black CS, White Daisy CS
Stamps: A Tree, Thoughtful Tidings (former SOTM - retired)
Other: Waterbrush, Olive Button (retired), Cuttlebug embossing folder, Cricut Art Philosophy
Thursday, January 31, 2013
Teen Girl Breakfast at Tiffany's Birthday Party
First off, congratulations Ann for guessing the theme of my daughter's 17th birthday party - Breakfast at Tiffany's! Please e-mail me at paigedolecki(at)yahoo.com with your mailing address so I can get your prize sent out to you!
I created almost the entire party with the CTMH Cricut Artiste Cartridge. I saved a ton of money by creating the party items but more importantly - there wasn't anything like them that I could even find locally regardless of price. Cricut Artiste is a must have for doing parties!
It all started with the Tiffany blue and Silver Shimmer Trim invitation. I used our new black pigment ink to stamp the front on inexpensive cardstock. What did I discover? Pigment ink doesn't bleed on cheapie pre-made cards that you can buy in multi-packs at Michaels so the invites came out great!

This was the first project we did as the girls arrived - a fun, personalized party hat for them to take home!




I created almost the entire party with the CTMH Cricut Artiste Cartridge. I saved a ton of money by creating the party items but more importantly - there wasn't anything like them that I could even find locally regardless of price. Cricut Artiste is a must have for doing parties!
It all started with the Tiffany blue and Silver Shimmer Trim invitation. I used our new black pigment ink to stamp the front on inexpensive cardstock. What did I discover? Pigment ink doesn't bleed on cheapie pre-made cards that you can buy in multi-packs at Michaels so the invites came out great!


I used Cricut Craft Room to remove the stars from the birthday hat on Artiste and cut these at full page size. I cut the black roses at 5.5" for 4 per page. The crepe paper rosettes were edged with silver glitter and pre-made as the glue took a little while to dry. The girls folded the hats, added the crepe paper trim, the baker's twine ties and glued the bow and rosette/rose embelishment on. These were SO cute on the girls!

Here is the scrumptious desert / candy bar I set up. My boys were looking forward to chowing down on the leftovers. Little did they know how much a group of teen girls can eat....

Check out the awesome 3-D chandelier I made by cutting 4 of the 2-D cuts from Artiste, scoring down the centers and gluing them together. I added some white gel pen lines to define the candles, silver glitz for the gems and yellow pigment inks/Stardust glitz for the flames. I adore this piece and will probably shift it to my craft room!

I cut 27 white roses at full page size and rolled them up - they are about 9" across finished size. The giant rosettes are (4) 12" segments of Cherry-O paper (the blue reverse) all put together in one big circle with a silver (only non-CTMH paper I used) metallic center circle. These are about 18" across.

I found these awesome zebra striped cupcake liners at Michaels and put my chocolate dipped GIANT marshmallows in them. They are on rock-candy wooden sticks and tied up with adorable baker's twine bows. I used dark chocolate and a light blue chocolate on these - they were delicious and adorable!

To get the delicate blue chocolate swirls on the marshmallows, I put some of the melted chocolate into a plastic sandwich baggie and cut a tiny tip from the corner to make a quick piping bag. Worked GREAT and no-mess clean up as I threw the bag out when done.

I baked Ghiradelli brownie mix in these shiny foil liners and added a flower of blue frosting on top. I found light blue pre-made frosting at Target (I think it was Pillsbury) for $1.99 and it was the PERFECT shade of blue!

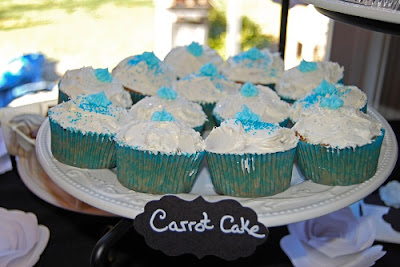
Yummy carrot cake muffins with cream cheese frosting and colored and clear sugar crystals. Don't you love those chalkboard labels? Its black cardstock cut with I think the Artiste cartridge and then I used our Chalkboard Marker to add the words. I loved the look - it was like a French pastry shop!

Even regular Hershey bars got a pretty update by wrapping them and adding a black CS cut out plus a beautiful rolled rose. The girls took those home with them in treat bags I had for them to fill up at the end of the party.

I placed some of the giant rolled roses around the treat table to give it some pizzaz. The soft carmels were a Costco find. Soooo yummy!

Absolute hit of the party - homemade caramel corn! I found the recipe HERE but after reading the reviews I cut the butter in half. It was the best caramel corn I have ever had in my life - seriously! I made a double batch which was good as my boys nearly cried when they saw this huge bowl was almost gone after the party. The girls were scarfing this stuff down!

Giant flower balloons - aren't these fun? I used blue 11" balloons and blew them up about 3/4 full. I tied two together and then took another set of two and crossed them over to create a four petal flower. I added a fifth petal by simply tying one to the center and then added a 5" black balloon to the center. At this point they looked like giant molecules - they weren't even sitting flat and looked nothing like a flower.
Here comes the magic - I tied a loop of curling ribbon to the back and then used 3-M command hooks on the wall and attached them to the hooks. The hook allowed the puffy balloons to stick to the wall (they were too puffy to stick with blue tape) and the wall pushed all the petals out evenly. Once they were hung I went in with a silver sharpie and added polka dots to the black center balloon and some curling ribbon stems. ADORABLE! The party store was charging around $13 PER FLOWER to do this with helium!

Close up of my cutie-patootie flowers.

And, last but not least a re-posting of my earlier prize post of the picture frame we made.

Whew! Thanks for sticking through all the photos! I used a ton of my scrapping stash (yay!) for the party decorations so it was mostly buying the cupcake liners, ingredients for food, black plates and napkins, the frames and balloons for cost. Somewhere around $50-$60 with enough non-perishable supplies left for another party.
I hope you find some inspiration in all of this! Like I said, my Cricut Artiste and Art Philosophy cartridges created pretty much ALL the stuff - from the picture frames to the party hats, the chalkboard labels, the giant flowers, the rosettes and anything else papery - it was all on the Cricut. If you have a party to plan, the CTMH Artiste cartridge is truly your go-to source for everything from holidays (Easter, Valentine's, Thanksgiving and Christmas, etc.) to boy and girl birthday parties and more. There are 14 themed holiday keys and an incredible number of images (700+) you can use for party planning.
If you don't have this little beauty yet, head over to my website at www.Paige.CTMH.com and pick it up for your next event - it will pay for itself with the money you save by creating your own party stuff that is WAY better than anything you can get at the store!
Thanks for sticking with me through this LONG post! The party was a blast and I hope you find some ideas to use for your next bash! Stay crafty my friends!
Paige
Monday, January 28, 2013
Glittering Picture Frame with new CTMH Glitter Paper and Artiste for H2H Challenges
Hi there friends! Don't you love it when what you have been working on perfectly ties in with something you needed to do anyways? I made this project last week but saved it because its just right for this week's challenge at Heart2Heart Challenges - All that Glitters! Make sure you get to the bottom of this post because I have a PRIZE for you this week!


As I mentioned a couple of posts ago, my little crickey bug and my Artiste Cartridge got a SERIOUS work out when I was prepping for my daughter's 17th birthday party. I made ALL the decorations, all the party favors, party hats, treats and just about anything else I could think of with paper, glue, a serious amount of glitter and a ton of love. I poured a lot of creativity into the party which helped keep the cash flow down (funny how that works hunh?).
This is one of the party favors that I made with the girls so it did double duty - it was an activity to do plus the girls took theirs home to remember the day.

Here is my glittery part - I cut all the crowns from our new Silver Glitter paper! Wowzer! I'm a big fan of our Silver Glitz Gel and have used it to cover a lot of stuff but this paper tops even the Glitz for shimmer and shine. Its shimmers like a thousand diamonds and cuts like butter with the Cricut!

Add a couple of rolled roses with a few dollops of Glitz in the centers.

I stamped the acrylic photo cover with our Archival Black Ink using one of the stamps from Whoo's Your Valentine. There is another clear cover on the back that I stamped with another saying so the girls can switch the photo caption out. I found these frames at Ikea a couple of weeks ago for just .99 cents each!

Can you guess what the theme of the party was?
Leave a comment and tell me your guess! I'll be sharing the full party later this week and I'll pick a random winner from the comments on this post! The prize is a flat pack of all the elements you need to decorate your own picture frame - one crown, the leaves and roses plus a fabulous zebra bow! (US/Can only please)
So leave a comment and then head on over to Heart2HeartChallenges.blogspot.com and see what glittery goodies the rest of the Design Team has for you and then put a little sparkle in your life by getting YOUR glitter on for this week's challenge!
What went into this project?
Paper: Black and Heavenly Blue Cardstock, Silver Glitter Paper (available Feb 1st)
Stamp: Whoo's Your Valentine (supplies running out on this special so click HERE to visit my site and order today) $10 with $35 order
Frame: Ikea
Zebra Ribbon (Costco about 2 years ago)
Thursday, January 24, 2013
Eiffel Tower Card with CTMH Artiste and La Belle Vie
The beautiful La Belle Vie paper pack is retiring at the end of this month so I thought I'd use it to make a quick card to show off its loveliness one more time. I used the Artiste cartridge to cut the Eiffel Tower shape as well as the doily and the banner shapes. Some quick stamping with the La Belle Vie WOTG stamp set (Magnifique) and our Jardin stamp set (the rose and text background on the doily) and I was pretty much done! Elegant, quick and simple - oooh-la-la - just my kind of card!


What's in this card?
Cuttlebug Embossing Folder
Subscribe to:
Posts (Atom)


 Posts
Posts


