Friday, September 28, 2012

Get your October Birthday Cards and more Kits before they are gone!

Happy Friday my friends!

Just a quick reminder to sign up for our October Birthday Cards and More class by this Monday, 1st October!  Our local class will be held on Friday, 5th October 7-9PM.

Pre-stamped and shipped to your door kits will continue to be available while supplies last so get your kits now before they are gone!


Purchase your kit today!
***If you are reading this via an e-mail delivery then you'll need to click out to my actual blog for the PayPal buttons to work.

Thanks for stopping by!  Have a terrific weekend!

Paige


Saturday, September 22, 2012

Art Philosophy Cricut Cartridge and Coordinating CTMH Stamp Guide

If you've seen a stamp set from the new Idea Book then you'll know that Close to my Heart has done a brilliant thing this year - they've added the page number of the AP or Artiste handbook where you can find the shape to go along with the size that they've always listed.  It is SO much easier to find the correct shape when you know to look on p.56 instead of having to flip through the whole book!

I recently saw some of my fellow consultants talking about a Cricut Art Philosophy cheat sheet that was created by a fellow consultant, Lucy Kelleher.  You can check out Lucy's blog - she's one of my fellow Heart2Heart Challenges Design Team Alumni!  Lucy created her document when Art Philosophy was first released so I went through my stash of stamps and added a whole bunch from the last Idea Book.

To use this information you can either print a copy of the "cheat sheet" and keep it by your machine or you can do what I've done and write directly on the paper that comes in each of your stamp sets.
I usually pull out my stamp sets at the beginning of my design so this should make things easy for me to find the Art Philosophy cuts!

Here is my updated version of  Lucy's original Google Doc:


When you are scrolling through you'll see I added a couple of older sets like "Buttoned Together" that I figured out the coordinating sizes for the shapes - sometimes you'll have to switch to 1/10 measurements to get a good fit for those.

I hope you all find this document helpful!  Thanks Lucy for creating the original!

Click HERE to see my October Birthday Cards and More kit!  Get 10 cards and one bonus Shopping Tote project all pre-cut, pre-stamped and shipped to your door!

Paige 

Wednesday, September 19, 2012

October Birthday Cards and More Class - Friday, 5th October


This month I am presenting extra options for our October Cards and More Class!  While you can still come to my local class, stamp and assemble for $15, I'm also offering a pre-stamped kit for local ladies who'd rather chat more and stamp less (LOL) as well as a pre-stamped and Priority mailed kit for those who are not local!

What's in a kit?  I'm being extra generous this month to start the new options off with a bang!  Each kit will contain everything you need to make 2 each of 5 cards (10 cards total) PLUS a bonus project this month - a sweet little shopping gift tote!  The shopping totes papers will vary but all will contain the three pink/red hues shown on the example (the papers I am using have a variety of patterns but all the same color way).  The shopping tote is approximately 5" wide x 4" high.  Envelopes are included for each card.


Purchase your kit today!


Orders are due by Monday, 1st October and all Priority Mail kits will be shipped on or before Friday, 5th October.  I have a cap of 15 kits so be sure to order yours today so you don't miss out!

Here are the pictures of each individual project - remember you get 2 each of 5 cards for a total of 10 cards PLUS a bonus tote project!


Bonus Tote Project (papers vary but all in the same pink/reds colors)


Friday, September 14, 2012

Fall Leaves card w/ AP and Artiste for October Card Class

This card was created using the Color Throwdown #209 colors.

I'm putting together a card class for October and this is one of the cards we'll be doing.  I wanted something with a fall theme but not Halloween as I'd like to do a separate workshop for that.

I love all the texture on this one!  I used several cuttlebug embossing plates as well as scoring with my stylus and a scoreboard to create the frame around the card.
My daughter loved the little acorns on this card. I didn't realize some of the fibers from the Burlap ribbon threads had drifted onto the one acorn when I took this picture.  I guess that's what happens when I have my contacts in and not my glasses when taking pictures!

I'm finishing up this card class this week and will post next week with a Paypal button for ordering kits!

Thanks for stopping by today!

Paige


Thursday, September 13, 2012

Swipe Hype Inking Technique Video by CTMH

I've always loved this inking technique on big blocky stamps! It really makes your image pop out with lots of texture. I hope you enjoy this video!
Isn't that heart card adorable?

Stay crafty my friends (said in an accent with my scissors raised in salute).

Paige

Wednesday, September 12, 2012

CTMH Cruisin' with Mojo Monday #258 and H2H Challenges

I haven't played along with a sketch challenge in far too long so this week I decided I'd spend a bit of time getting creative with sketches again.  Sketch challenges are wonderful for getting your creative juices flowing.  I try to up the challenge for myself by starting with a stamp set I haven't used or used enough that I feel like I've gotten my money's worth from it yet!

I bought the set "Born to Ride" several month's ago because of the hot rod flames.  I really like the other images too but hot rod flames are a running joke in our house (from Foster's Home for Imaginary Friends if you've ever seen that show) and so I just had to get this set.

I used my Gray Wool and Honey watercolor pencils to shade in the details on the motorcycle and then went over the metallic parts of the image with Liquid Glass.  I like how it gives the image some dimensionality with the matte tires and shiny motorcycle.

I made this card for these challenges - check them out:
2.  Heart 2 Heart Challenges - BIG size cards (this one is 5x6.5")

Products I used on this card (all CTMH unless noted):
Cruisin' Paper (retired)
Watercolor Pencils

Thanks for stopping by today!  If you haven't had a splash of creativity in your day yet, I hope you'll pop on out to these two challenges sites and have some fun.  I truly believe that we all need regular doses of creativity to feed our souls.

Paige


Tuesday, September 11, 2012

Bend it, shape it, stamp it CTMH video

This video talks about the different things you can do with your clear acrylic stamps like shape them on the block to change the way they look, bend them on a curve, etc.  Most of you who visit my blog are familiar with CTMH clear acrylic stamps so you already know how easy they are to manipulate but there are so many cute pieces of artwork shown on this video that I know you'll love seeing it!


Isn't that summer day bracket frame just adorable?  Love it!

I have a kid home sick today - such a bummer to start the school year off with an absence.  He tried to make it to school but didn't even get through the doors before he deposited breakfast in the bushes.  So my morning started off with a scramble of getting one back from school before I took the youngest to elementary.  Then it was off to the dentist for me for a cleaning and making an appointment for not one but TWO crowns that need to be done.  Ka-Ching!  For my birthday this year I get to be a princess 'cause I'm getting my crowns.  HA!

So hopefully you all are having less of a crazy issue filled morning than I had!  Thanks for stopping by today!

Paige


Monday, September 10, 2012

Rose Tote Box with CTMH Avonlea and Cricut Artiste

I know I've said it before but I seriously adore making the 3-D bags, boxes and flowers from our two Cricut cartridges - Art Philosophy had a bunch but Artiste has TONS of these cuts.  Here I've used our gorgeous Avonlea paper mixed up again with Smokey Plum to create a beautiful box perfect for gift giving.

This is the adorable gable tote box was cut to fit a page so the overall dimensions are about 4 7/8" wide x 2 1/4" deep x 4" high.
The rose and leaves were also cut with Artiste.  When I roll up my roses I'll often glue them, lightly spritz them with water and then take a heavy acrylic block and smoosh them down a bit.  This flattens the flowers out and helps curl some of the edges.  Its a fast way to get them looking more natural without fiddling with the individual petals.

I took a sanding block to the edges of the leaves and also ran a score line down the middle in order to sand a vein into the leaf.
If you'd like to make this project, click on the links below to purchase these products:
Bronze Glitz Glitter Gel (center of rose)

Thanks for stopping by today!  I hope you have a fabulous Monday to kick off a new week!

Paige


Friday, September 7, 2012

Creating a Party with Artiste Cartridge

Here is a super cute birthday party put together using the birthday theme key on the Cricut Artiste Cartridge. After watching this I had to make a cupcake card this morning!


Isn't that adorable? The cartridge also has several rosettes/yo-yos with decorative edges so don't worry that you have to do all the scoring - with the cartridge you can have them cut and just fold at the dash lines to make the rosette.

 The Artiste collection unleashes some serious creativity! To check out the cartridge and its 700 images including 14 themed keys visit my website at www.Paige.CTMH.com.

 Have a happy crafty day!

 Paige

Thursday, September 6, 2012

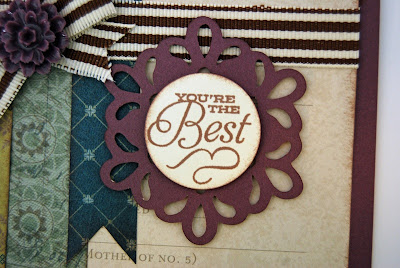
You're The Best card with CTMH Avonlea and Kudos

The stamp sets that come with the Artiste Cricut cartridge are awesome!  This sentiment comes from the set called "Kudos" which also contains one of my new favorites - a huge rosette stamp with ribbons you can add, best part of all is that you can cut the shapes on the Cricut to stamp.

In the new Idea Book there is a card making workshop using the Avonlea paper pack that pulls in Smokey Plum as an accent color - right up my alley because I love purples.  
Did you know you can cut our Chocolate grosgrain ribbon in half if you want a smaller ribbon?  The 1.5" ribbon would have overwhelmed this card but cut in half it was perfect!
The resin flower is from a set that went with our Sonoma papers.  I've been hoarding the purple flowers but it was perfect for this card.
Who doesn't like to be told they are the best?  Wouldn't this card make you happy if you got it in the mail? 

If you'd like to make this project, click on the links below to purchase these products:
Artiste Collection (for doily and sentiment)
Thanks for stopping by today!  

Paige

Tuesday, September 4, 2012

Avonlea Sympathy Card

I can hardly believe we are already on the second week of school.  The first week is always spent being a wee bit mopey for me.  I have a good cry when all my kids are out the door on the first day of school and I always feel a bit blue until we settle back into the routine of school.  I like that our school district does a three day week for the first week and a four day week for the second week of school because of Labor Day - it gives me a chance to ease back into having them gone so much.  We spent our Labor Day laboring together staining our fence (not a fun job but one that was a couple of years overdue so very necessary) and we drained our pool.  Summer is officially over for us when we drain the pool - LOL!

I'm still missing them terribly today but having them gone did allow me to finally finish a photo shoot of the rest of the creations I made for the Summer Customer Carnival I held last month.  Here is a sympathy card I made with our beautiful Avonlea paper pack.  The warm rich tones and peaceful gray, blue and green color scheme worked well for this type of card.  Really this one could be any kind of card if you changed the sentiment but I wanted to have a sympathy card or two ready in my stash.

Close up of the circle detail - I scored the edges of 1" punched circles and folded them in for this border.  A bitty pearl at the center of each intersection gives it a bit more finesse.
I echoed the bitty pearls on the border with a line of bitty pearls under the sentiment.


If you'd like to make this project, click on the links below to purchase these products:

Thanks for stopping by today!  I hope you had a wonderful Labor Day weekend - whether you labored like we did or just enjoyed the sunshine and the last bit of summer!

Hugs,

Paige

Related Posts with Thumbnails

Blog Archive

Copywrite - or sharing the love!

Thank you for visiting me here on my blog today! I hope you have been inspired by my postings to create something lovely for yourself! It does take me a whole lot of time to create the artwork, tutorials and posts for this blog so if you would like to borrow my wording or artwork then I respectfully ask that you e-mail me for permission, credit me and/or link back to my blog. Thanks for your understanding and respect!

Paige